Thursday, June 28, 2012

First Water Marbling Attempt!

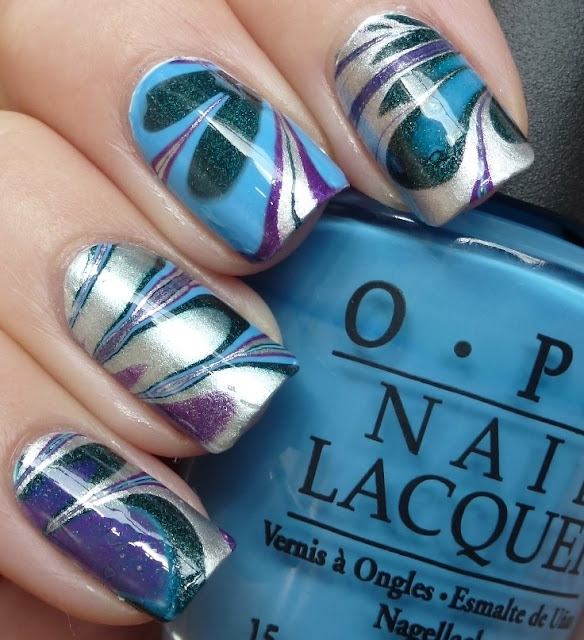
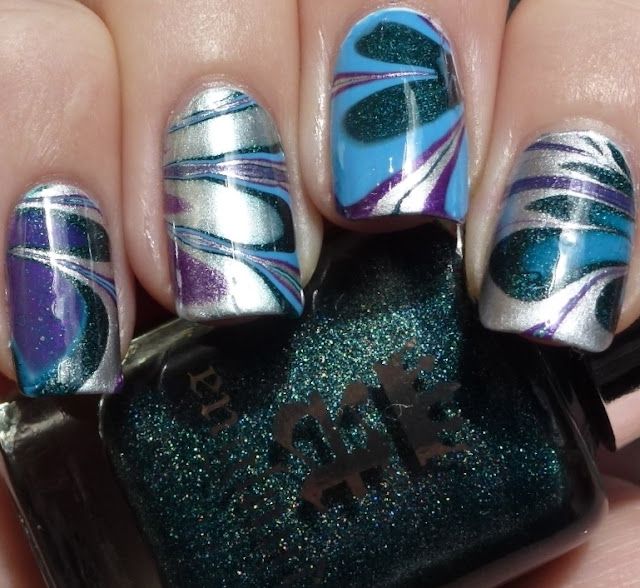
Today I have for you my very first attempt at a water marble mani! I've always looked at pictures and tutorials for water marbling and thought that I'd love to give it a go some time, but I was never brave enough. Well, yesterday I plucked up the courage to give it a good go. It took a fair while but I have to say I'm pretty happy with how it came out considering it was my first go... To the pics...


Water Marble nails, a-england Avalon, Excalibur, Sait George, OPI No Room For The Blues
Here it is! I used three of my gorgeous a-england polishes - 'Saint George', 'Excalibur' and 'Avalon' - and OPI 'No Room For The Blues'.


Water Marble nails, a-england Avalon, Excalibur, Sait George, OPI No Room For The Blues
I came up with this colour combo in the middle of the night the other night and I think it was pretty cool. I want to try a bit more subtle water marble in the near future, but I do love how this one looked. 'Excalibur' tended to spread further than the others so that's why the silver is a bit more prominent in 2 of my fingers.


Water Marble nails, a-england Avalon, Excalibur, Sait George, OPI No Room For The Blues 
You can see what I mean about the silver spreading in these photos (plus I just love the look of the bullseye! So pretty). A handy tip I picked up from LTHP was to use a smaller glass so that you can get a tighter bullseye with less polish, though in saying that I didn't actually end up doing a tight bullseye at all.


Water Marble nails, a-england Avalon, Excalibur, Sait George, OPI No Room For The Blues
There's a couple of kinks that definitely need to be ironed out. I'm not 100% sure why, but I got a few bubbles. I have actually since found a pretty awesome little tips and tricks post from Lacquerish that may explain this little problem. Like I said earlier, I am definitely going to be giving this technique another go soon, hopefully with a bit more finesse thanks to the things I've learned! It was so much fun, albeit very messy!


Water Marble nails, a-england Avalon, Excalibur, Sait George, OPI No Room For The Blues

Water Marble nails, a-england Avalon, Excalibur, Sait George, OPI No Room For The Blues
These are the designs on my thumbs. I didn't really get fantastic pictures of them, but you can certainly get the idea. My thumbs ended up being some of my favourites! Both of my thumbs some how came out with perfect little french tips in silver on my right thumb (see the left side of the top pic) and in purple in my left thumb (the right side of the bottom picture) - please excuse the tip wear, I got called into work last night and they got a bit thrashed!


Just because this is a post about my first marbling attempt, I thought I'd better pop in a photo of the actual first finger. This is on my left hand (hence it not being in the other photos) but it's kind of cool. Very different to the more flower sort of designs on most of my right fingers.


So what do you guys think? I had so much fun doing this mani and I can't wait to try some other exciting techniques. Anyone with any tips or suggestions about how to avoid pesky water bubbles, please let me know in the comments section! One other small problem I had was with top coat. Every single one of my top coats except one, Essie's 'Good To Go', made the polishes go all blended and cloudy. Particularly 'Saint George' would tend to mix with both 'Excalibur' and 'No Room For The Blues'. Curious, but luckily I tried my other top coats on my left hand fingers and thumb before doing anything on my right fingers :)

Monday, June 25, 2012

Road House Blues - OPI and another go at stamping!

Oh no! I'm not a happy chappy right now! This often comes as a surprise, even to people who know me really well, but I have a massive love for Formula 1, especially all things Sebastian Vettel. Well, I have just watched him retire from the Valencia Grand Prix and let's just say I am one grumpy lady!

Anyway, on to happier thoughts... Today I've got a simple mani that I have actually loved wearing for the last couple of days.


Roadhouse Blues, Touring America, OPI, BM208 China Glaze Sci-Fi
This is 'Road House Blues' from last years Touring America collection by OPI. 'Road House Blues' is a gorgeous dark indigo crème polish. I love any polish that is at all navy-like and this is certainly one of my favourite crèmes in my whole collection.


Roadhouse Blues, Touring America, OPI, BM208 China Glaze Sci-Fi
You can see in this photo that this polish is certainly not the type that just looks black. I love how inky this colour is. In any sort of bright-ish light, this polish appears very blue.


Roadhouse Blues, Touring America, OPI, BM208 China Glaze Sci-Fi
I decided I wanted to have another little go at stamping but I didn't want to entirely cover up 'Road House Blues', so I thought I'd try the double feature nails that I've seen around a bit lately. I used China Glaze 'Sci-Fi' for the stamping with plate BM 208 (both images are on this plate). I actually just got 'Sci-Fi' recently from Nail Polish Anon's blog sale and it's perfect for stamping, so thanks Michaela!


'Road House Blues' was easy to apply. Two simple coats with no problems at all. As I mentioned earlier 'Sci-Fi' was great for stamping and I like that it's got that purpley tinge to it, giving it a bit of difference from a plain silver polish. I did get pretty impatient and top coated way to quickly so I did smudge everything a bit, but it's really not very noticeable in real life. Overall, I really like how this turned out and I love the double feature. I think I'll definitely be sporting this sort of mani again in the near future.


One more quick thing, I have been awarded an Appreciation Award from the lovely Kelsie from Kelsie's Nail Files! Thank you so much Kelsie!


To be honest, I have no idea what to do with this. I think I'm supposed to pass it on, but I don't think I can choose only a few blogs from the ones that I follow. Basically I love and appreciate every single blog that I follow so that's my choice! I know it's a bit of a cop-out but that's just the truth! Thanks again Kelsie :)

Friday, June 22, 2012

Sea Creature - The Hungry Asian - & School Of Hard Rocks - Essie

I have never been so excited about a glitter in all my life. As I put 'Sea Creature' on, I was all "ooohhh aaahhh"... Let me attempt to show you why...

But first I'll just quickly show you what was underneath this amazing glitter. I used Essie 'School Of Hard Rocks' as my base colour for this mani.


School Of Hard Rocks, Essie swatch
'School Of Hard Rocks' is a dusty looking dark teal colour. Really pretty actually. I love how the colour is somewhat greyed out and a bit muted.


School Of Hard Rocks, Essie swatch
These photos show 'School Of Hard Rocks' without top coat and you can see that it's gorgeously shiny.  The colour reminds me a lot of raw greenstone.


Sea Creature, The Hungry Asian, School Of Hard Rocks, Essie, swatch
This is 'Sea Creature' from The Hungry Asian. I actually got this a little bit ago. I originally set out to get 'Sneeze Breeze' (which I did also get :) ) and I saw this and just chucked it in my cart thinking the bottle shot looked quite nice. Well thank goodness I did! Like I said at the top of this post, I've never been so in love with a glitter.


Sea Creature, The Hungry Asian, School Of Hard Rocks, Essie, swatch
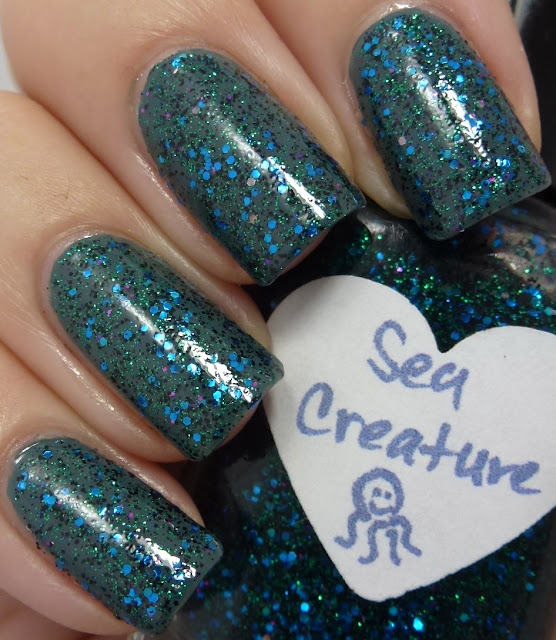
'Sea Creature' is made up of little black matte hexes, tiny green glitter, slightly larger pinky-purple hexes and larger blue hexes. It's my absolute favourite mix of glitters of all the glitters I own.


Sea Creature, The Hungry Asian, School Of Hard Rocks, Essie, swatch
I love the pink bits of glitter. They're a really surprising addition to this polish to me, but they just catch your eye perfectly and really give this mix of glitters that little extra je ne sais quoi.


Sea Creature, The Hungry Asian, School Of Hard Rocks, Essie, swatch
Here's the macro. Isn't 'Sea Creature' brilliant?!


To the formulas... 'School Of Hard Rocks' was a simple two coater. The only little niggle I have with this polish is that it was really thin, the type of watery polish that wants to pool in your cuticles, so a bit of careful and patient application is needed. As for 'Sea Creature'... So easy to apply. The glitter stayed exactly where it was put and was so simple to get a nice even spread. I used 2 thin coats of 'Sea Creature' and I think it's great that thinner coats can be used so that you are in full control of how much glitter you end up with on your nails. It was a pretty hungry fella though, so you are seeing 3 coats of Cult Nails 'Wicked Fast' on top. 'Wicked Fast' is a really awesome but fairly thin top coat, so if you use something like Seche Vite, you shouldn't need so many coats at all to get it smooth.


'School Of Hard Rocks' can be purchased from anywhere that sells Essie's (Kiwi's - quite a few pharmacies, Smith & Caughey and Candy Girl (which is by far the cheapest)), and 'Sea Creature' can be purchased from The Hungry Asian Etsy store for $9.25 USD (apparently $12 NZD according to Etsy) and I have just checked and I think 'Sea Creature' is in stock right now! Check out her other beauties too :)

Tuesday, June 19, 2012

Red Lights Ahead... Where? - OPI

I have officially finished this semester with my last exam this morning! WOO! But along with that awesome feeling, comes a complete feeling of being entirely lacking in any functional brain cells! Basically I'm not making much sense this afternoon so this is just going to be short and sweet :)

This is another polish from OPI's Holland collection. This is 'Red Lights Ahead... Where?' and it is a magnificent coral leaning red. LOVE!


Red Lights Ahead... Where?, OPI swatch
I love wearing any type of red polish! 'Red Lights Ahead... Where?' is a bit more summery due to the coral undertones. Mmmmhhmmmmm...


Red Lights Ahead... Where?, OPI swatch
The coral comes out a little more in this lower ambient light.


Basically this polish is awesome. One coat gave pretty full opacity, but I popped on another one to make it all smooth and pretty.

Anyway, now that I'm on holiday for a bit, I'm going to have a go at some different polish techniques and hopefully, if the sun ever comes out, get some swatching done because I have just about nothing left to post :s

Friday, June 15, 2012

Gummy Worm - Enchanted Polish

Study study study... Blah blah blah...


So today I have a quick little post about a polish from an indie brand that I have fallen for in a big way. Yes Enchanted Polish, you have stolen my heart... So first up I will show you guys 'Gummy Worm'.


Gummy Worm, Enchanted Polish, swatch
This is the first Enchanted Polish that really caught my attention. 'Gummy Worm' is a sort of acid green holo with a yellowy gold duochrome thing happening.


Gummy Worm, Enchanted Polish, swatch
'Gummy Worm' is like the more toxic looking version of Dollish Polish 'Master Chief' and we all know how much I LOVED that polish! I found it near impossible to get the full holo effect in these pics, it's a bit more obvious in real life.


Gummy Worm, Enchanted Polish, swatch
At the top of my nails you can see the yellow that comes out to play. This seems to be more obvious indoors in artificial light.


Gummy Worm, Enchanted Polish, swatch
This is 'Gummy Worm' indoors in ambient lighting and you can see that the green softens and becomes really rather beautiful.


'Gummy Worm' had easy and hassle-free application. Two very easy coats for full opacicity, end of story. No aqua base needed, no dulling with top coats... Holo just the way I like it.


Enchanted Polish is available from Llarowe and Harlow & Co. and both of these just restocked so there should be at least some beauties left (and yes I picked up some more of these pretties). They are $15USD a pop.

Tuesday, June 12, 2012

A bit o' stamping with a-england and Cult Nails...

So I know I hardly ever do nail art on here and really I'd love to do more, but I'm just not so good at it! I know, I know practice makes perfect, so after exams I'm going to try my hand (lol sorry!) at a bunch of different techniques.

Anyway on to the post... What better way to procrastinate from studying than to do some stamping. I'm quite a rookie so this is quite a scary endeavor! And as I show you guys my dominant hand (my right one), it's particularly scary. You all see the work of my VERY unco left hand in my pics :)


Elaine, a-england, The Mythicals, swatch
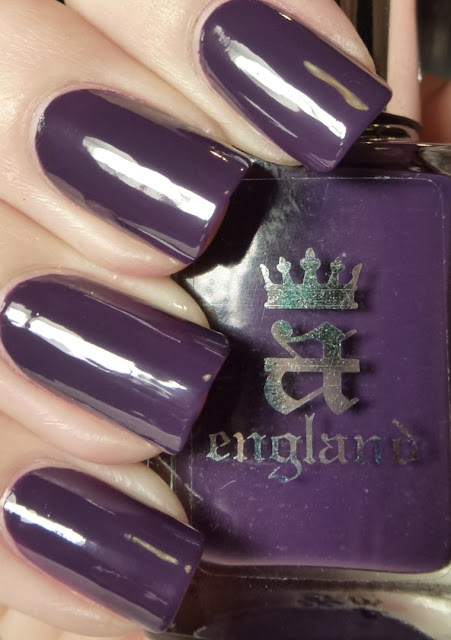
I started off with the fabulous 'Elaine' from a-england's The Mythicals collection. 'Elaine' is a gorgeous dark purple that is one of the glorious darks that never becomes too dark so as to appear black. It keeps it's purple tones perfectly!


Elaine, a-england, The Mythicals, swatch
'Elaine' is a sort of aubergine purple. These two photos show 'Elaine' with no top coat! Yes, she is naturally this shiny. LOVE!


Elaine, Princess Tears a-england, BM04, swatch
Next up I used another of a-england's beauties 'Princess Tears' to stamp an image from Bundle Monster's plate BM04. I've seen a few people using 'Princess Tears' for stamping recently and I loved the subtle beauty of it, so I thought I'd give it a go. It was very easy to stamp with, giving me no problems at all!


Elaine, Princess Tears a-england, BM04, swatch
I love how the holo in 'Princess Tears' still manages to shimmer away. So pretty. By the way, if you want to see 'Princess Tears' on her own, have a look here.


Elaine, Princess Tears a-england, BM04, swatch
A bit of a close up on the design. I've never used this design on myself before, but I tried it out on my Mum back at christmas time when I first got the stamping plates.


Elaine, Princess Tears a-england, Seduction, Cult Nails, BM04, swatch
Seeing as how I apparently can't leave well enough alone, I just had to apply this beauty that arrived in my mail box that morning...


Elaine, Princess Tears a-england, Seduction, Cult Nails, BM04, swatch
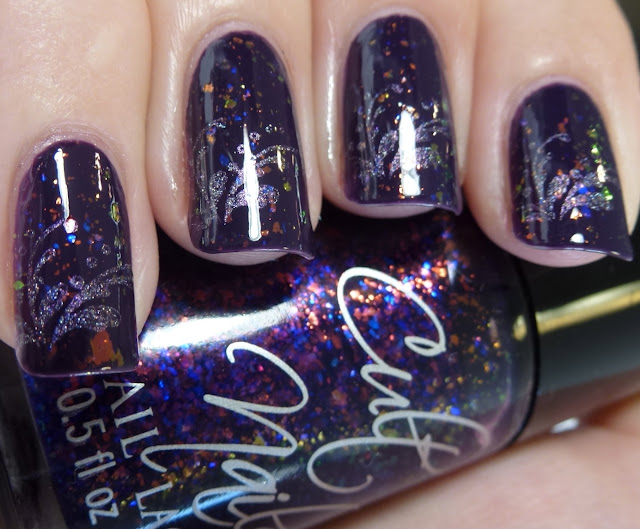
This is Cult Nails 'Seduction' and it's my first taste of the Cult!! I got Cult Nails base and top coats (more about them at the end) and I couldn't resist getting this too. I think there are going to be MANY more Cult Nails polishes joining my stash in the not so distant future. Anyway... 'Seduction' has a purpley-blue jelly base with a whole lot of gorgeous flakies. They shine so many different colours! Red, orange, copper...


Elaine, Princess Tears a-england, Seduction, Cult Nails, BM04, swatch
... Green, yellow, blue...


Elaine, Princess Tears a-england, Seduction, Cult Nails, BM04, swatch
And all at the same time! I love 'Seduction'! It's got just enough pieces to give good coverage without over-powering. I just want to mention that I'm almost entirely blaming loving Marta of Chit Chat Nails who has made me want Cult Nails polishes for a long time and finally I couldn't stand seeing her amazing swatches of them for another moment without trying them for myself. So thanks Marta!


Right, to the formulas... 'Elaine' was nothing short of perfection. Almost opaque at one coat so that the second coat provided perfect coverage and HIGH shine! 'Seduction' was also a pleasure. I used one simple coat and it was easy to get enough flakies and they spread really easily too. I used the other newbies to my stash for this too. I used Cult Nails 'Get It On' base coat and 'Wicked Fast' top coat. I've seen so much hype about these online lately and so I thought I'd see what all the fuss was about. Well let me just say that I took this manicure off this afternoon (about an hour ago) and it had been on for 7 days! I had no chips and barely any tip-wear! I have to say this is probably partly due to the AMAZING wear time that a-england polishes have, but I have given my nails a bit of a thrashing this past week too! I have since put on my next mani with Cult Nails base and top coats and we'll see how it goes this time, but after this first go... I can see why all the raving!


a-england polishes are available for £9 with free worldwide shipping from their website and Cult Nails polishes are available from their website for $10USD. Both are also available from a bunch of e-tailers.

Saturday, June 9, 2012

Fast Track - China Glaze

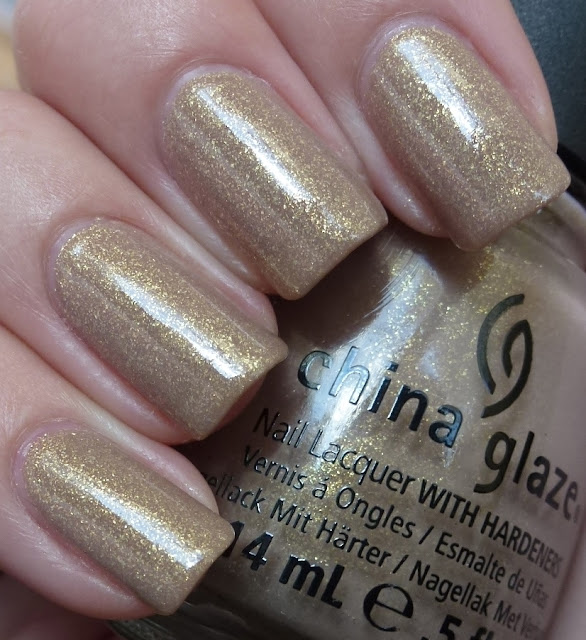
I've got for you all today a beauty that I know has been on pretty much every blog already, but I figure the hype has settled a bit now, so I may as well throw my piece in too. This is China Glaze's 'Fast Track' from The Hunger Games 'Capitol Colors' released just recently.


Fast Track, China Glaze, Hunger Games - Capitol Colors, swatch
From the very first moment I saw the previews of this collection on all the blogs, this was by far the colour that I was most excited about (weird I know). I love neutral shades and the gold in this just made my heart skip a beat every time it popped onto my screen! When this beauty arrived at my door, it was even better in real life! I LOVE this polish!!!


Fast Track, China Glaze, Hunger Games - Capitol Colors, swatch
'Fast Track' reminds me of those suede couches where if you brush the fabric one way it changes colour. I used to love visiting people with these couches and making all sorts of pretty patterns! The simple things in life ay?! Anyway 'Fast Track' is a gorgeous soft beige colour with that kind of glitter/flake/glass fleck that I love!


Fast Track, China Glaze, Hunger Games - Capitol Colors, swatch
In lower indoor ambient light, the polish deepens slightly and somehow the gold becomes more apparent! Now this polish reminds me of cashmere. 'Fast Track' represents District 6 (transportation), but it makes me think of District 8 (textiles) lots! Best thing about this polish... the gold never becomes lost!


Fast Track, China Glaze, Hunger Games - Capitol Colors, swatch
I love this type of finish but I just don't know how to describe it! And I also love that 'Fast Track' is jam-packed with these little glass flecks/flakes/glitters.


The formula on this polish was also perfect! I used two coats on my left hand and it was opaque to the naked eye, but I did a third coat on my right hand for photo purposes as the macro settings on my camera love to make polish look like it's less opaque! Overall we have a major winner! I used a-england's 'The Knight' as my base coat and Essie 'Good To Go' on top.

Kiwi's, this polish is available on Candy Girl for $14.95.

Wednesday, June 6, 2012

Khloé Had A Little Lam-Lam - Nicole by OPI & Heart Of Glass - Dollish Polish

I have been dying to try this Nicole by OPI polish since I got it so long ago but for some reason I didn't until now. This is 'Khloé Had A Little Lam-Lam', one of the Kardashian Kolors released in 2011.


Khloé Had A Little Lam-Lam, Nicole by OPI, Kardashian Kolor, swatch
First up, apologies for the sorry state of my cuticles! I didn't realise they were so bad until I was going through these photos for this post! Anyway... 'Khloé Had A Little Lam-Lam' is A-MA-ZING!!! This is without top coat and look how shiny! It's a gorgeous blackened tealy colour and oh boy do I just love it!


Khloé Had A Little Lam-Lam, Nicole by OPI, Kardashian Kolor, swatch
It can actually look quite green-y blue in certain lighting. The top photo shows the blackened side of it with this photo showing a bit more of the ocean blue/green. How the bottle looks in this photo is about as blue as it gets on the nail.


After I put this polish on, I wasn't satisfied and I had not long since received two more Dollish Polishes. I had seen 'Heart of Glass' on Nail Polish Anon over navy and knew more than ever that I needed that polish. So here I was with my new bottle of 'Heart of Glass' thinking I might have to go ahead and try it over 'Khloé Had A Little Lam-Lam', seeing as it looked so perfect over navy on Michaela. By the way, if any of you haven't been over to Michaela's blog, you may want to get onto that :) She's a fellow kiwi blogger and her blog is awesome. She is possibly the most to blame for my new-found indie polish love!


Khloé Had A Little Lam-Lam, Nicole by OPI, Kardashian Kolor, Heart Of Glass, Dollish Polish swatch
It was such crappy weather the day I put this on and I took literally hundreds of photos trying to get even one that resembled just how freaking gorgeous this really was, but I didn't get any! You will have to take my word for it when I say this is a holographic glitter dream come true and even better in real life!


Khloé Had A Little Lam-Lam, Nicole by OPI, Kardashian Kolor, Heart Of Glass, Dollish Polish swatch


Khloé Had A Little Lam-Lam, Nicole by OPI, Kardashian Kolor, Heart Of Glass, Dollish Polish swatch
Isn't it perfect! And another reason why I love this, I have never really jumped on the whole bar glitter bandwagon as they make me think of something that I'm not going to get into here :p But I have to say the little bars in this are just right and I wouldn't have it any other way!


Khloé Had A Little Lam-Lam, Nicole by OPI, Kardashian Kolor, Heart Of Glass, Dollish Polish swatch
I just had to add in this macro. Don't you love the quirks that come with glitter polishes! Like that bunch of bar glitter where the cuts haven't separated them fully. It kept catching my eye :)


So there you have it, another post of polishes that I love! I promise I am capable of feeling other emotions, just not very often when it comes to polishes. It has become something of a challenge to me to find a polish that I put on and can truly say that I hate.
The formulas on both these polishes were also the stuff that dreams are made of! 'Khloé Had A Little Lam-Lam' was so close to being a one coater and anyone with a steadier hand than me (not hard) could certainly make one coat work, I think. It's pretty thick but in the best way. Something else that I loved is that it was super forgiving. I was in such a hurry to get this polish on that I whacked it straight onto my strengthener without any base coat. The Essie strengtheners that I use have tended to make polish pull and do all sorts of weird stuff but this polish didn't care about any of that. It just spread itself onto my nails like butter on hot toast! As I said earlier, the photos up top are sans top coat and you can see just how shiny that bad boy is! 'Heart Of Glass' was also very easy! The shards did tend to settle pretty quick so make sure you give it a good mix. It was easy to get a good wash of the holo and bar glitter and all the glitters sat perfectly flat except one little piece on my thumb. I used a single coat of Essie 'Good To Go' on top.

'Khloé Had A Little Lam-Lam' is available in NZ at Farmers, Smith & Caughey and a bunch of pharmacies. 'Heart of Glass' can be purchased from Dollish Polish website, though not currently. I think Dolly is having a restock soon but unfortunately this won't be one of the polishes in this round.

Sunday, June 3, 2012

Floam - Nail-Venturous

I have today, a polish that needs no introduction. Nail-Venturous 'Floam'. From the very first moment I saw this polish on blogs earlier this year, it became a bit of an obsession of mine to get my hands on it! Cut forward to May and well... the rest, as they say, is history...


Floam, Nail-venturous, swatch
So here it is, the coveted 'Floam'. It's a mixture of blue, green and yellow matte glitter. And yes, I am, like the rest of the polish world right now, completely CRAZY for these little matte pieces of happiness!


Floam, Nail-venturous, swatch
The whole time I was wearing this polish, the weather was pretty average, so I didn't manage to get a photo in full sun. The brighter the light on this beauty, the more the yellow seems to come to life. The first photo is by far the brightest and as we go through to less intense light, you'll see the blue especially take more centre-stage.


Floam, Nail-venturous, swatch
So here we have it in very overcast "sun". Not such an obnoxious polish in this sort of lighting. I have to say I loved it best in bright light so it was a colour over-load but I liked that it could tone-down a fair whack as well.


Floam, Nail-venturous, swatch
A macro to show you just what exactly makes up this polish that sends me speeding back to the good old days of my childhood in the '90's.


'Floam' is absolutely jam-packed with glitter so this is 3 coats for pretty awesome opacity. It was so super easy to apply and the glitter was quite happy to stay exactly where I put it. One thing is that this polish is THICK! It's OK though, because it didn't affect application at all. 'Floam' was also really fast-drying, so you don't have to wait a hundred years between coats to make sure the glitter doesn't pull away from your cuticles. The glitter is pretty hungry so I used two thick coats of Essie 'Good To Go' on top and it was still a little bit gritty (I don't mind this though). Anywho, I'm so glad I got 'Flaom'! I don't think I would have ever rested until it was safely in my box(es) of polish :)

I purchased 'Floam' from Ninja Polish for $9USD. It's currently out of stock but keep an eye out and if you want it, pop your name down for email notification of when it's back in stock.