This polish was easy to work with and I used 2 thick-ish coats. I really liked this polish and actually got a few comments on it at work. Sometimes I think a nice simple polish with a little shimmer is just what I need :) Thanks Mimi!
Thursday, January 31, 2013
Grey-t To Be Here - Essence
I have just a short sweet post for today. This is another polish sent to me from the lovely Mimi from Makeup Withdrawal. Essence 'Grey-t to Be Here'...
'Grey-t To Be Here' is a gorgeous grey polish with those little glass fleck bits in that I love. What makes this polish particularly loved by me is the fact that the little flecks have a shift in colour from an orangey-gold through to bright pinky-purple and sometimes even appearing slightly green. Here's the thing... I found the shimmery particles near impossible to capture in all their glory. Have a look at the bottle to see what I mean. The visibility of the shimmer in real life is not as much as what the bottle shows, but significantly more than what is seen on my nails in these photos.
This polish was easy to work with and I used 2 thick-ish coats. I really liked this polish and actually got a few comments on it at work. Sometimes I think a nice simple polish with a little shimmer is just what I need :) Thanks Mimi!
This polish was easy to work with and I used 2 thick-ish coats. I really liked this polish and actually got a few comments on it at work. Sometimes I think a nice simple polish with a little shimmer is just what I need :) Thanks Mimi!
Labels:
Essence
,
Glass Fleck
,
Grey

Saturday, January 26, 2013
Va Va Voom - Takko Lacquer
I am back in Wellington for the weekend for a wedding and I am so happy to be home with my family for an extra weekend :) Hope you are all having a nice end of your week/weekend! Anyway, on with the polish. This is Takko Lacquer 'Va Va Voom'...
'Va Va Voom' is a most gorgeous rusty red scattered holo. These two photos show the holo in sunlight and then in artificial light. Obviously, in real life, in artificial light, the holo is more obvious but you can still certainly see it quite well. It's not too shy.
'Va Va Voom' tends to show as different shades of red, from quite a cherry red, through to a dark brooding red, right through to quite a coppery red at times.
There is a golden flash in 'Va Va Voom' that gives it a more orangey tinge.
I absolutely love this polish. I have a very soft spot for red polish and I always have, but this is more than just a red polish. There is certainly an X factor here. The fact that it is sort of a burnt/rusty red sets it apart, along with that wonderful scattered holo. Like the other Takko Lacquer polishes I have shown you, 'Va Va Voom' is fast drying and dries slightly satiny and really comes alive with a lick of top coat. I used 2 coats here, but 'Va Va Voom' is very opaque and the second coat was barely needed.
Takko Lacquer polishes are available from Sheryl's Etsy store. All the polishes are vegan, 3-free and not tested on animals. Check outTakko Lacquer blog for updates on restocks etc.
Labels:
Holographic
,
Indie
,
Red
,
Takko Lacquer

Tuesday, January 22, 2013
Pastelchio - Lime Crime & Wicked - Whimsical Nail Polish by Pam
Hi!
How are you all? Have you guys been watching the Aussie Open? How good is it?! I have been watching tennis almost every spare moment that I have. I love it. Anyway, on with todays post... This is something that I wore while I was in Wellington - Lime Crime 'Pastelchio' with Whimsical Nail Polish by Pam 'Wicked' over top.
I love both these polishes and they worked so well together. 'Wicked' has a gorgeous shimmer through it that did get slightly lost on top of 'Pastelchio'. It was ok though, as it was visible in sunlight and especially on top of those awesome big black circle glitters. How perfect is this polish for its inspiration!
As usual, the Lime Crime, 'Pastelchio', was really opaque and barely needed the second coat for full coverage. It did dry slightly satiny (like the others) and also dried very fast. Unfortunately 'Wicked' caused me a little bit of grief formula-wise. If I wiped any polish off the brush, the glitter would just come straight off with it. I certainly had to dab the glitters on in 2 fairly thick coats. At the time, it was pretty frustrating, but luckily it looked awesome enough for me not to worry too much.
Lime Crime polishes are available from Harlow & Co. and Whimsical Polish by Pam is available via her facebook page (but they are unfortunately only available in the US).
Labels:
Crème
,
Glitter
,
Green
,
Indie
,
Lime Crime
,
Whimsical Nail Polish by Pam

Friday, January 18, 2013
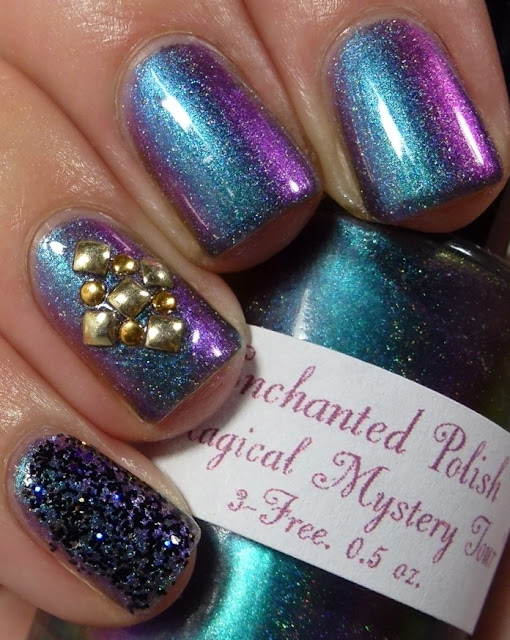
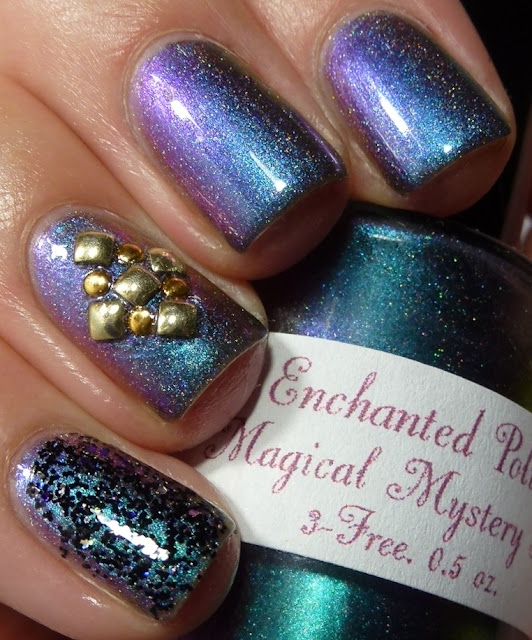
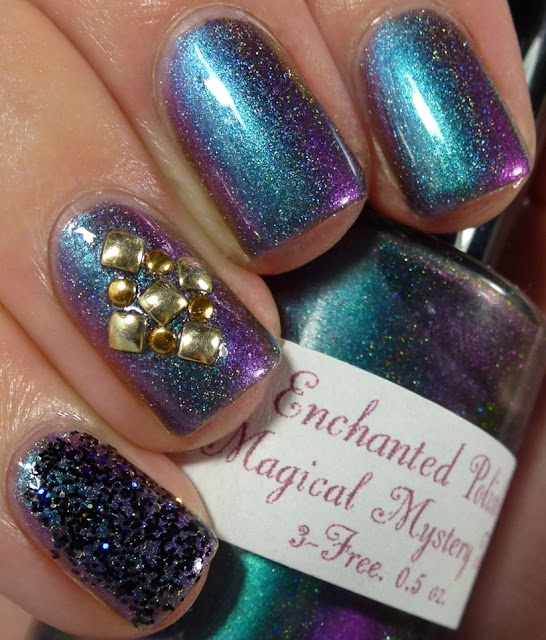
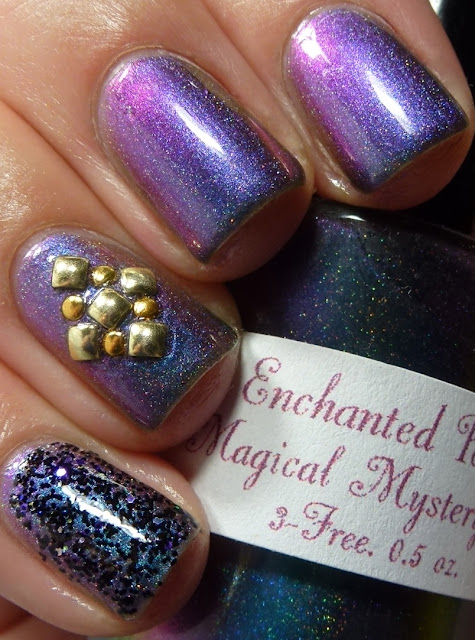
Magical Mystery Tour - Enchanted Polish & Triple Black Diamond - CrowsToes (Studded)
I have something to show you today that is so long overdue. I wore this mani to our staff Christmas party last year in mid December. Trouble is my skin and nails were not particularly loving life, moisture-wise, so I have been putting off showing it. You may feel like you've seen this stud design somewhere before... I put a picture on Instagram when I first did it and since then a couple of lovely bloggers have used the stud design, so I felt maybe I should put the pictures up properly myself. So here we go... WARNING, 'Magical Mystery Tour' is amazing so there are a fair few photos!
'Magical Mystery Tour' is one of my favourite polishes. Enchanted Polish just does multichrome polishes so well. There are so many colours in this polish! These 3 photos show the most obvious shifts from blue to purple to pink to red.
Next on the list of shifts is the blackened side of this polish, seen in lower light. You can also see a bit more of the holo goodness in the darker areas too.
'Magical Mystery Tour' shifts to the most beautiful bright green/teal. It was really hard to capture and was even more green toned in real life. The index finger on the first of these photos shows it a little bit.
These last three photos show the more purple side of 'Magical Mystery Tour'. The top photo shows the gorgeous indigo colour that is a bit shy, but so pretty. Then the bright royal purple and finally the shift to pink.
Clearly I am IN LOVE with this polish! I could wear my Enchanted Polish multichromes every day of my life, but I would get nothing done because I spend the phole time staring at them trying to find new colours that I haven't seen before. I actually really liked this whole mani. On my pinky is a coat of CrowsToes 'Triple Black Diamond' and on my ring finger are studs purchased from Born Pretty Store. The formula of 'Magical Mystery Tour' was great too. I used 3 thin coats for full coverage, but I think some people would certainly get away with 2 coats.
Enchanted Polish is available from a few places including Llarowe and Harlow & Co. and CrowsToes is also available from Llarowe.
Labels:
Blue
,
CrowsToes
,
Enchanted Polish
,
Glitter
,
Holographic
,
Indie
,
Multichrome
,
Pink
,
Purple
,
Studs

Tuesday, January 15, 2013
Neon Water Marble Take 2...
Hi guys!
Sorry for being slightly AWOL. We have had a busy last week in Wellington trying to spend lots of time with family before coming home. Anyway, I had another terrible time trying to marble in Wellington. There is something about that city that means I just can't make it work! After about 3 hours of trying, I managed to pull together something that looked like it worked. I had wanted to do some pastel colours, but the China Glaze neons were the only ones that I could make marble, so here we go...
Don't look too close, because it is not my best work, but considering how much went wrong I think it turned out ok. I used OPI 'My Boyfriend Scales Walls' with China Glaze 'Sun-Kissed', 'Surfin' For Boys', 'Splish Splash' and 'I'm With The Lifeguard'. On the top is a coat of Chi Chi 'Disco Diva'.
As to what went wrong, I have NO idea! I was using polishes that I knew marbled well as I have used them before but something just wasn't right. We tried everything to fix it (temperature, different water etc etc) and I have come to the conclusion that there is just some sort of curse against me marbling in Wellington :) Now I'm back home I am going to reattempt my original idea.
Labels:
Blue
,
Chi Chi
,
China Glaze
,
Green
,
Neon
,
OPI
,
Red
,
Water Marble
,
White
,
Yellow

Wednesday, January 9, 2013
Polish Days - Something New
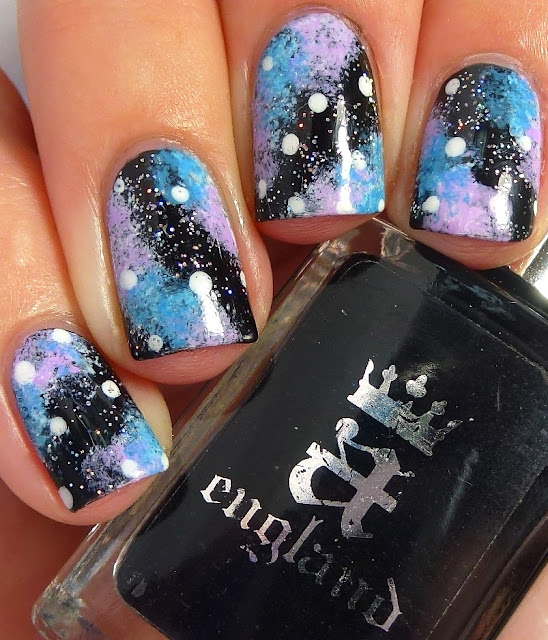
Polish Days time again! I love participating in Polish Days, because it pushes me to do something that I wouldn't necessarily get round to otherwise. So this month Hannah of Polly Polish set the theme to be 'Something New', as "January is all about new starts, resolutions and starting over". I took this as a good kick up the bum to finally try a new technique - Galaxy Nails. I had slightly limited supplies, as I did this mani in Wellington. When I go home and have more time and polish, I'd quite like to try a slightly more complex version with a different colour combination etc. For now though, I do quite like this simple galaxy mani...
I got my inspiration from a lot of googling of NASA images and also from the lovely Sarah from Chalkboard Nails.
This mani was so simple and I don't know why I thought it would be so hard?! Now I want to do more like these.
For this I used a-england 'Camelot' for the base, China Glaze 'Sweet Hook' and OPI 'No Room For The Blues' for the sponging. The dots are OPI 'My Boyfriend Scales Walls' and of course, a bit of Chi Chi 'Disco Diva' on there too.
Make sure you check out everyone elses 'Something New' manis...
Labels:
a-england
,
Chi Chi
,
China Glaze
,
Galaxy Nails
,
OPI
,
Polish Days

Sunday, January 6, 2013
Jelly Sammie with Big Hair... Big Nails - OPI
Once again I have eaten a feast of food tonight and have finally gotten home (happy and full) to some internet, so... It's jelly sammie time again! This time with something a little brighter...
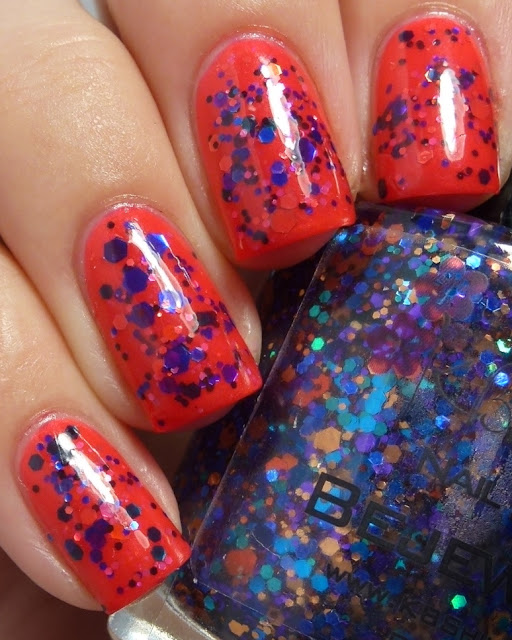
This jelly sandwich doesn't translate super well to these photo, but you can get the idea at least. For this look, I used 2 coats of China Glaze 'Surfin' For Boys', followed by a coat each of KB Shimmer 'Bejeweled' and CrowsToes 'Absolum - Your Potions Master'. I finished up with 2 coats of OPI 'Big Hair... Big Nails'.
This picture is a little closer to how insanely bright it was in real life.
Overall I really liked how this turned out. It was a bit different to what I've done before but at this time of the year it felt pretty perfect. I probably could have done with an extra coat of top coat for these photos, but as I've said before a little texture never bothers me. Everything in this mani was easy to apply formula wise. I used 2 coats of 'Big Hair... Big Nails' because I love the more suspended/floating look of the glitter in a jelly sandwich.
Labels:
China Glaze
,
CrowsToes
,
Glitter
,
Indie
,
Jelly
,
KB Shimmer
,
OPI
,
Orange

Tuesday, January 1, 2013
Christmas Mani #2 - with Cult Nails, a-england & CrowsToes
HAPPY NEW YEAR!!
I have been away for a bit because we went camping in the Hawkes Bay with my brother and his girlfriend. It was kind of nice to be away from all technology for a few days and just enjoy some nature, good company and a good book. Anyway, my nails have been naked and unfortunately we had a few breakages. That's ok though, my nails have been growing fairly quickly lately.
So today I have my actual Christmas Day mani to show you...
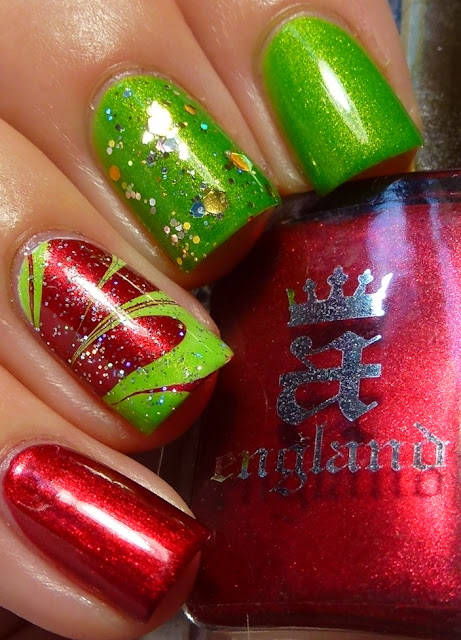
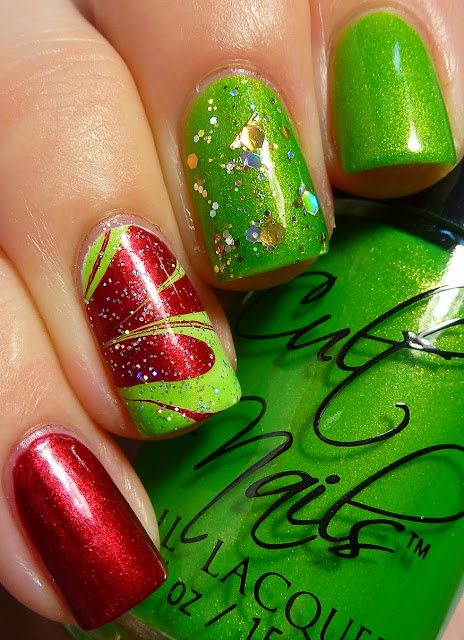
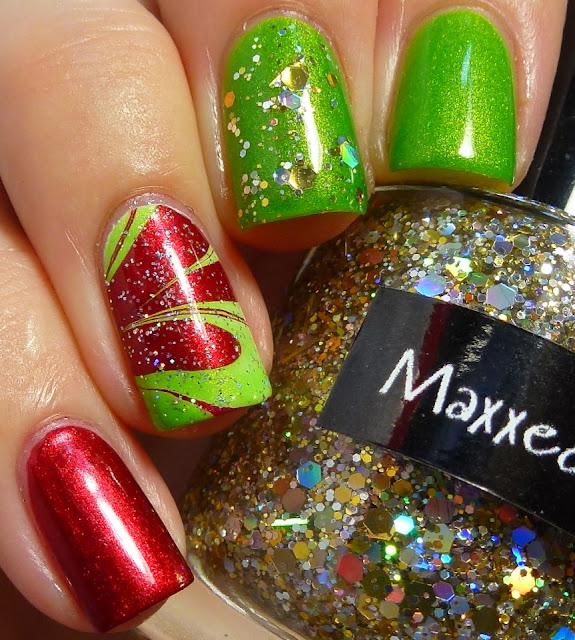
I already told you in my previous post about how much I LOVE a-england 'Perceval' so naturally I simply had to use it again. And with the perfect red, I had to use the perfect green and in my book, greens don't get much better than Cult Nails 'Deal With It'!!
On top of the water marbled finger is, of course, a layer of Chi Chi 'Disco Diva' and on my middle finger is a coat of CrowsToes 'Maxxed Out'. Déjà vu anybody?
I am so much in love with the amazing golden shimmer in 'Deal With It' and the best part... It's really not shy. The golden shimmer is really quite visible in most lighting.
'Deal With It' had a really lovely formula and for this mani I used 3 thin coats. Again, I used 2 thin coats of 'Perceval' for my pinky finger. I am pretty happy with how this mani turned out and I think I am finally getting the hang of water marbling! Yay because I really love the effect of it.
Hope you are all having safe and happy New Year celebrations! I'm off for another roast dinner tonight! I think I'm going to burst if I keep eating like this!
Labels:
a-england
,
Chi Chi
,
CrowsToes
,
Cult Nails
,
Glitter
,
Green
,
Holiday Nails
,
Red
,
Water Marble

Subscribe to:
Comments
(
Atom
)


