Hellooo!
I have a freaking gorgeous polish on here tonight. This is 'Imperial' that was made in collaboration with the wonderful Jeanette from The Swatchaholic. I purchased this a little while ago and have worn it several times, each time trying to capture it accurately. Let's just say this is not an easy polish to photograph, but here we go anyway…
'Imperial' is such a beautiful royal purple colour. Just the right amount of red and blue to make the most perfect, saturated purple. As you may or may not know, I don't tend to wear much purple polish (no idea why, just a random thing), but I cannot get enough of this beauty. The gold shimmer and irregular flakes in it make it even more beautiful and complex. What an amazing job all these girls have done to make such a beauty - definitely an absolute favourite of mine.
'Imperial' is lovely to work with. 2 coats is all that is needed for full opacity. One thing to keep in mind is that this polish dries slightly matte, so top coat is a must (though in my opinion that is always the case!).
piCture pOlish is available from a whole bunch of places. Make sure you check out the piCture pOlish website, you can order this polish direct from them for $10 AUD or you can have a look at their list of distributors. You can also find piCture pOlish on instagram, twitter, facebook, pinterest and YouTube.
Showing posts with label Picture Polish. Show all posts
Thursday, September 4, 2014
Monday, August 25, 2014
piCture pOlish Blog/Insta Fest 2014!!
I'm so excited to be part of piCture pOlish Blog/Insta Fest 2014! This year Blog/Insta Fest is made up of 2 parts so let's get started with part 1…
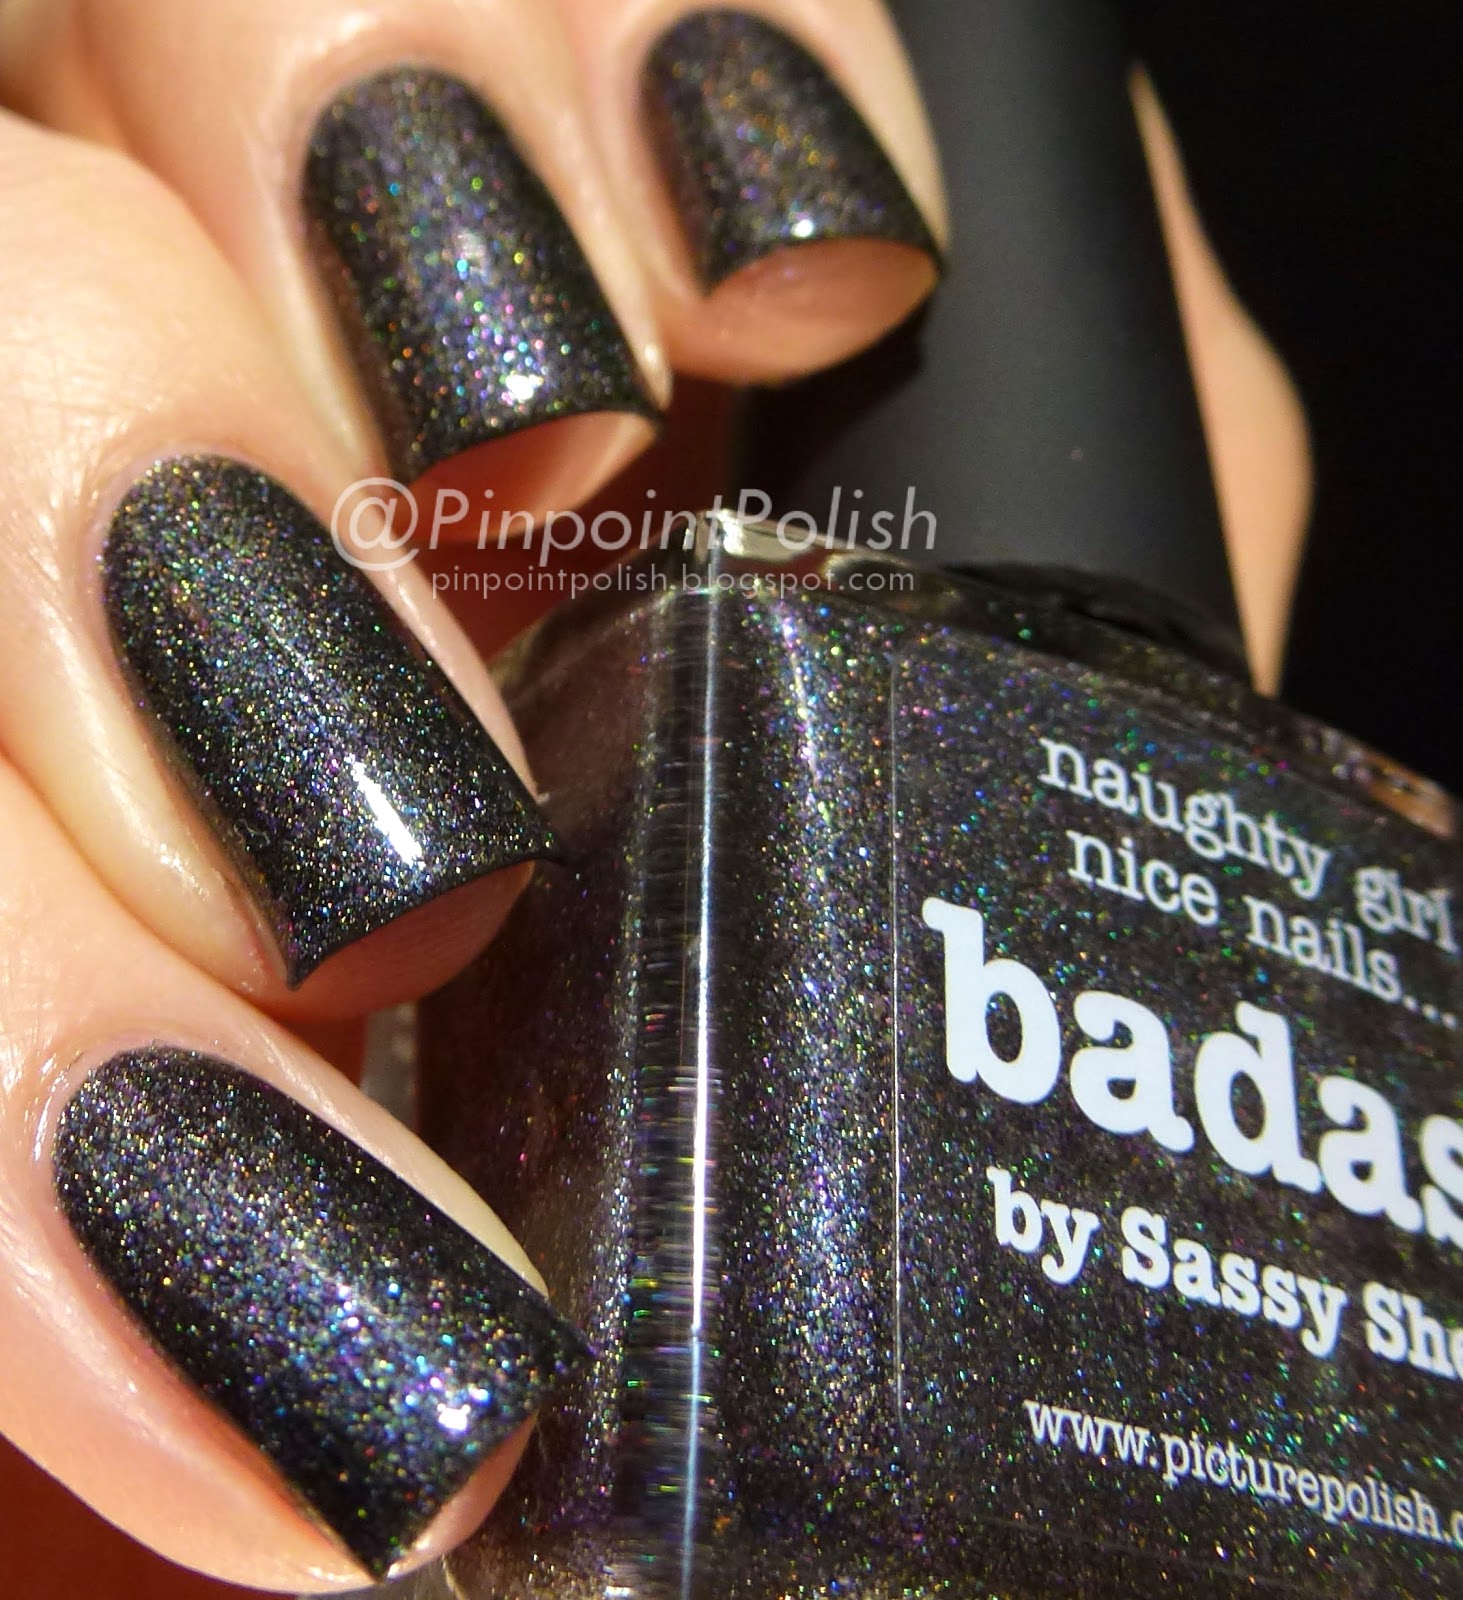
First up I have a gorgeous shade to show you that was made in collaboration with Sassy Shelly called 'Badass'. We all know how much I adore holos and so it shouldn't come as a surprise that I really like this polish. 'Badass' is a beautiful scattered holo with a black base - I love how black the base is without hiding the holo effect too much at all. To make matters better, the formula is great too. As is the usual story with piCture pOlish polishes, this had great opacity with 2 coats being perfect.
The next part of Blog/Insta Fest is to celebrate not only some more wonderful piCture pOlish shades, but also Nail Vinyls that have just started being stocked there.
This is the look I came up with using piCture pOlish 'Hot Lips' and 'Honeydew' along with the chevron design from Nail Vinyls. I have a quick step by step of how I made this look.
Starting with a white base, I placed the nail vinyls where I wanted them with one small area and one large area on each nail. I painted 'Honeydew' just in the small section and immediately peeled up the vinyls. Next, I top coated to speed up the drying time of everything.
Next up I placed the vinyls right on top of the green and painted 'Hot Lips' on the large area of my nails and peeled up the vinyls immediately again. I actually repeated that step again to make the pink a bit more opaque. Again, wait for everything to dry completely and place some vinyls on top of the pink right against the green. Place another vinyl to leave a really thin gap and then another after a slightly larger gap (see the bottom pic there). Paint these bits white and then once dry place vinyls either side of the larger white stripe and paint with 'Honeydew'.
Et voilà. Top coat to seal everything in and you're done. I really love how this turned out - these colours go so perfectly together and they take me right back to the fashion of my childhood (does anyone else remember slouch socks and hair scrunchies?). It does require a little patience while each layer dries but it's totally worth it in my opinion.
A couple of tips for working with the vinyls - from my experience it is absolutely best to peel them off while the polish is still wet, also I found that if I stuck them down too hard they would leave a slight gluey residue (they are plenty sticky so you don't need to press them hard). Overall, these vinyls are a nail art must have! They make nail art so easy and you can make some really striking nails with relatively little effort.
Now to the important details - where can you get your hands on all these things? piCture pOlish is available from a lot of places all around the world and of course from them direct from Australia. Pop over to their network page to find where is closest to you. piCture pOlish always has really great deals which you can see on their Every Day Deal page too.
Nail Vinyls are available from them direct with international shipping and of course from piCture pOlish too. piCture pOlish will be selling a special exclusive pack that includes Chevrons, Mini Chevrons, Straight and Right Angles which you'll be seeing used inBlog/Insta Fest this year :)
Make sure you follow Nail Vinyls and piCture pOlish to keep up with all their latest news and info.
Labels:
Black
,
Green
,
Holographic
,
Nail Vinyls
,
Picture Polish
,
Pink
Saturday, March 8, 2014
Blue Ombré - Featuring piCture pOlish, Color Club and OPI
HI!!!
I'm still here! Apologies for the extended hiatus, I have just had my first week of uni and it has been crazy busy, albeit pretty freaking cool! It's so great to be in a lab doing real things! Anywho, I will try and get some posts lined up in the weekend in the future so that I don't go so long with nothing.
I tried an ombré mani for the first time last week. My first thought was blue, followed very closely by HOLO! So that's just what I went with…
I kinda love this mani! It makes me want to do more ombré manis and also makes me wonder why I've never done one before! I used piCture pOlish 'Cosmos' and 'Ocean' on my pinky and ring fingers, then Color Club 'Over The Moon' and OPI 'DS Sapphire' on my middle and index fingers.
I won't go much into formula etc, other than to say that these polishes are all pretty great formula-wise (other than the fact the the OPI is slightly sheer and oh-so-stinky).
What are your favourite colours for ombré manis?
I'm still here! Apologies for the extended hiatus, I have just had my first week of uni and it has been crazy busy, albeit pretty freaking cool! It's so great to be in a lab doing real things! Anywho, I will try and get some posts lined up in the weekend in the future so that I don't go so long with nothing.
I tried an ombré mani for the first time last week. My first thought was blue, followed very closely by HOLO! So that's just what I went with…
I won't go much into formula etc, other than to say that these polishes are all pretty great formula-wise (other than the fact the the OPI is slightly sheer and oh-so-stinky).
What are your favourite colours for ombré manis?
Labels:
Blue
,
Color Club
,
Holographic
,
Ombré
,
OPI
,
Picture Polish
Friday, October 25, 2013
Denim - piCture pOlish
Hi folks!
How are you all? I am about 1 week out from my last exams of my current degree! WOO. So that's why my posts are a bit further apart at the moment. Anywho, I have a gorgeous piCture pOlish shade today that you saw in my Blogfest mani a bit ago. This is 'Denim'...
'Denim' is the most gorgeous intense periwinkle blue. Anything remotely periwinkle, I must have, so I lusted after this baby for a fair while. I was so excited to get it as one of my Blogfest polishes! 'Denim' has heaps of shimmer and little irregular particles in it that catch the light and shine so beautifully giving an almost iridescent look. For my accent watermarble, I stayed in the piCture pOlish family. I used 'Cosmos', 'Monroe' and 'O'Hara'. I quite like how these colours complimented 'Denim' so well. It reminds me of the chromatography science experiments I used to do at primary school - you know separating the colours out of a dot with a felt-tip pen... No?... Ok...
'Denim' was pretty easy to work with. It is a little bit thick, but dries good and fast so no worries about pulling or anything like that. I used 3 coats for these photos, but I think you could get away with 2 (depending on how thick your coats are).
piCture pOlish is available from a whole bunch of places. Make sure you check out the piCture pOlish website, you can order this polish direct from them for $10 AUD or you can have a look at their list of distributors. You can also find piCture pOlish on instagram, twitter, facebook, pinterest and YouTube.
Some of these products were provided for review. This is my personal, unbiased opinion.
For more information, see my disclosure policy.
How are you all? I am about 1 week out from my last exams of my current degree! WOO. So that's why my posts are a bit further apart at the moment. Anywho, I have a gorgeous piCture pOlish shade today that you saw in my Blogfest mani a bit ago. This is 'Denim'...
'Denim' is the most gorgeous intense periwinkle blue. Anything remotely periwinkle, I must have, so I lusted after this baby for a fair while. I was so excited to get it as one of my Blogfest polishes! 'Denim' has heaps of shimmer and little irregular particles in it that catch the light and shine so beautifully giving an almost iridescent look. For my accent watermarble, I stayed in the piCture pOlish family. I used 'Cosmos', 'Monroe' and 'O'Hara'. I quite like how these colours complimented 'Denim' so well. It reminds me of the chromatography science experiments I used to do at primary school - you know separating the colours out of a dot with a felt-tip pen... No?... Ok...
'Denim' was pretty easy to work with. It is a little bit thick, but dries good and fast so no worries about pulling or anything like that. I used 3 coats for these photos, but I think you could get away with 2 (depending on how thick your coats are).
piCture pOlish is available from a whole bunch of places. Make sure you check out the piCture pOlish website, you can order this polish direct from them for $10 AUD or you can have a look at their list of distributors. You can also find piCture pOlish on instagram, twitter, facebook, pinterest and YouTube.
Some of these products were provided for review. This is my personal, unbiased opinion.
For more information, see my disclosure policy.
Labels:
Blue
,
Picture Polish
,
Shimmer
,
Water Marble
Monday, October 14, 2013
Electric Blue - piCture pOlish (and some new Bundle Monster stampin')
Hi hi!
I have a quick post to show you today of a mani that I loved. First of all, lets look at the base I used, which is the absolutely gorgeous 'Electric Blue' by piCture pOlish.
How beautiful and glowy is 'Electric Blue'? I love navy blue polish a lot and it's polishes like this that remind me why. The base colour is really dark, but the blue shimmer shines through so amazingly.
I love how this turned out. I used the new Bundle Monster plate BM-416 with Color Club 'Miss Bliss' on the pinky and ring fingers and then I added 1.5 layers of Dollish Polish 'Say Hello To My Kitty'. I love how well the Color Club 'Halo Hues' stamp. The holo effect seems to amp up so much. The new Bundle Monster set is fantastic! So many wonderful designs. How great is it that you can get this splatter effect with out much clean-up?!
'Electric Blue' was so easy to work with. I used 3 coats for these photos, but depending on how thick your coats are, I'm sure 2 would be enough. 'Say Hello To My Kitty' needs a good tip upside down before using it, but I didn't need to fish anything out for this look. Some of the larger glitters are a little less willing to come out, but no worries for me.
piCture pOlish is available from a whole bunch of places. Make sure you check out the piCture pOlish website, you can order this polish direct from them for $10 AUD or you can have a look at their list of distributors. Dollish Polishes are available from Dolly's Big Cartel shop for $10.
I have a quick post to show you today of a mani that I loved. First of all, lets look at the base I used, which is the absolutely gorgeous 'Electric Blue' by piCture pOlish.
How beautiful and glowy is 'Electric Blue'? I love navy blue polish a lot and it's polishes like this that remind me why. The base colour is really dark, but the blue shimmer shines through so amazingly.
I love how this turned out. I used the new Bundle Monster plate BM-416 with Color Club 'Miss Bliss' on the pinky and ring fingers and then I added 1.5 layers of Dollish Polish 'Say Hello To My Kitty'. I love how well the Color Club 'Halo Hues' stamp. The holo effect seems to amp up so much. The new Bundle Monster set is fantastic! So many wonderful designs. How great is it that you can get this splatter effect with out much clean-up?!
'Electric Blue' was so easy to work with. I used 3 coats for these photos, but depending on how thick your coats are, I'm sure 2 would be enough. 'Say Hello To My Kitty' needs a good tip upside down before using it, but I didn't need to fish anything out for this look. Some of the larger glitters are a little less willing to come out, but no worries for me.
piCture pOlish is available from a whole bunch of places. Make sure you check out the piCture pOlish website, you can order this polish direct from them for $10 AUD or you can have a look at their list of distributors. Dollish Polishes are available from Dolly's Big Cartel shop for $10.
Some of these products were provided for review. This is my personal, unbiased opinion.
For more information, see my disclosure policy.
Labels:
Bundle Monster
,
Dollish Polish
,
Glitter
,
Holographic
,
Navy
,
Picture Polish
,
Stamping
Monday, July 29, 2013
piCture pOlish Blog Fest 2013 - Celebrating the Year of the Blogger!
Hi everyone!
I'm really excited to to be a part of piCture pOlish Blog Fest 2013! The brief was to create some nail art using 3 shades supplied to us by the lovelies at piCture pOlish. It's doubly exciting because there are 3 awards available, with the prizes being the opportunity to make a collaboration shade with piCture pOlish. The 3 prizes are chosen by 1) the fans and friends of piCture pOlish, 2) the participants of blogfest and 3) the girls of piCture pOlish (Jules and Megs). You can vote on your favourite nail art creation byhopping over to piCture pOlish on Pinterest and voting. Update: You can go to the piCture pOlish website to vote. But hurry, because it only runs till the end of tonight (NZ time).
The 3 shades I got were 'Atomic' (a collaboration shade with the super talented Sarah from Samarium's swatches), 'Denim' and 'Electric Blue'. This is the look I came up with...
As soon as I saw 'Atomic', 'Denim' and 'Electric Blue' together, they absolutely screamed gradient. They work so beautifully together.
Right, let's get on with how I went about getting this look...
You can check out everyone else's manis by checking out #ppblogfest2013 on twitter and instagram. Also make sure you are following piCture pOlish. They can be found in lots of different places - Facebook Twitter Pinterest Instagram You Tube Google +.
piCture pOlish polishes can be purchased directly from Australia (check out their Everyday Deals page too), or visit their network page so you can find a distributor closer to where you live.
I'm really excited to to be a part of piCture pOlish Blog Fest 2013! The brief was to create some nail art using 3 shades supplied to us by the lovelies at piCture pOlish. It's doubly exciting because there are 3 awards available, with the prizes being the opportunity to make a collaboration shade with piCture pOlish. The 3 prizes are chosen by 1) the fans and friends of piCture pOlish, 2) the participants of blogfest and 3) the girls of piCture pOlish (Jules and Megs). You can vote on your favourite nail art creation by
The 3 shades I got were 'Atomic' (a collaboration shade with the super talented Sarah from Samarium's swatches), 'Denim' and 'Electric Blue'. This is the look I came up with...
As soon as I saw 'Atomic', 'Denim' and 'Electric Blue' together, they absolutely screamed gradient. They work so beautifully together.
Right, let's get on with how I went about getting this look...
First, I painted my nails with strengthener and base coat, followed by one coat of 'Atomic'. Once dry, I taped off my cuticles in order to make clean up a little easier later on.
Next, I painted a generous line of 'Denim', 'Atomic' and 'Electric Blue' on some wax paper. Using a tooth pick I swirled the adjacent colours together just a little bit, mixing 'Denim' out slightly to each side. I dipped the sponge into the polish, tapped it lightly on the wax paper, then sponged on to my nail moving up and down my nail with very small motions to ensure a smooth gradient.
I have to thank Sammy from The Nailasaurus for this particular technique! You can check out her original tutorial here.
I repeated the sponging steps 3 times, ensuring the previous coat was completely dry each time. After that, I cut the tape off and cleaned up around my cuticles using an angled brush and pure acetone.
This is the cleaned up gradient and at this point it doesn't look very smooth. I slapped on a coat of quick-dry top coat and then once dry I used a coat of piCture pOlish 'G'day Matte' (matte top coat) on all but my ring finger. On my ring finger, I used a second coat of my regular top coat.
I waited until my nails were entirely dry and set before I went near the taping part. In fact, I did the taping part the next day. Using Magic Tape, I masked off the lines to taper near the cuticle end. You could use striping tape here, but as I show you my dominant hand (I have to do all this with my left hand), I used full tape so I wouldn't go over the edges.
Wait for the previous stripe to dry and set COMPLETELY before taping off the next one. I can't stress this enough, because they will pull off with the tape otherwise and you don't want to have to do the whole gradient over again. Paint the stripes (I used 2 thin coats for 'Denim' and 'Atomic') and carefully pull the tape off - preferably while the stripe polish is still wet. I repeated this whole process, with lots of drying time in between, to get 3 stripes on each nail.
To finish up, I added some studs to my feature nail, just sticking them on by dipping a tooth pick into top coat, dabbing it on my nail and then using the tacky toothpick to pick up and place each stud. I spaced them in a way that mirrored the gradient effect on my nails.
Phew, so this is it. I quite liked the way the gradient looked once matte, with the shiny stripes on top. What do you think?
piCture pOlish polishes can be purchased directly from Australia (check out their Everyday Deals page too), or visit their network page so you can find a distributor closer to where you live.
These products were provided for blog fest 2013.
For more information, see my disclosure policy.
Labels:
Blue
,
Gradient
,
Picture Polish
,
Striping Tape
,
Studs
Wednesday, June 19, 2013
G'day Matte - piCture pOlish
Hi guys!
I am sad to say that my piCture pOlish review series is coming to a close today! I've really loved all of the polishes that I got to show you. I have a pretty awesome polish to finish on. This is their fairly new matte top coat, 'G'day Matte'. I absolutely love me some matte nails, but I haven't posted many on here because I have trouble making them look good. I have always used Essie 'Matte About You' and have always had a bit of trouble with it, but 'G'day Matte' is a whole different story. I love it.
One more thing, if you follow me on Instagram, you may have seen that I did a spot of hand modelling on the weekend for the awesome kiwi designer, Saben. We got our nails done by the lovely Leah Light and her team. It was heaps of fun, but they needed us all to have almond shaped nails. As you know, I keep my nails very square usually. I have started to head back that way, but they are very short (especially at the sides) so bear with me while I grow them back to my usual square shape :)
Anyway onto 'G'day Matte'...
So here's the bottom line. 'G'day Matte' is amazing! It is so incredibly forgiving and is so so so easy to use. I don't care how who you are, you will be able to rock this baby! Look how pretty it is over 'Cosmos'. Love it - I don't know what else to say. I used 'LeaLaC XL - B' stamping plate and I used a-england 'Lancelot' and, of course, piCture pOlish 'Cosmos' as the bases.
Déjà vu anybody? When I did my mani with piCture pOlish 'Blogger', I mattified it and, holy moly, it looked cool. I've never ventured into the land of matting glitter before, but I'm thinking this won't be the last time.
So I already said that the formula is amazing. As I said, it is incredibly forgiving. Absolutely zero trouble at al. It levelled out perfectly and as usual with a matte top coat, dried really fast. Speaking of drying really fast, the stamping worked perfectly using 'G'day Matte', but i did work really quickly so it would transfer before drying.
piCture pOlish is available from a whole bunch of places. Make sure you check out the piCture pOlish website, you can order this polish direct from them for $10 AUD or you can have a look at their list of distributors.
I am sad to say that my piCture pOlish review series is coming to a close today! I've really loved all of the polishes that I got to show you. I have a pretty awesome polish to finish on. This is their fairly new matte top coat, 'G'day Matte'. I absolutely love me some matte nails, but I haven't posted many on here because I have trouble making them look good. I have always used Essie 'Matte About You' and have always had a bit of trouble with it, but 'G'day Matte' is a whole different story. I love it.
One more thing, if you follow me on Instagram, you may have seen that I did a spot of hand modelling on the weekend for the awesome kiwi designer, Saben. We got our nails done by the lovely Leah Light and her team. It was heaps of fun, but they needed us all to have almond shaped nails. As you know, I keep my nails very square usually. I have started to head back that way, but they are very short (especially at the sides) so bear with me while I grow them back to my usual square shape :)
Anyway onto 'G'day Matte'...
So here's the bottom line. 'G'day Matte' is amazing! It is so incredibly forgiving and is so so so easy to use. I don't care how who you are, you will be able to rock this baby! Look how pretty it is over 'Cosmos'. Love it - I don't know what else to say. I used 'LeaLaC XL - B' stamping plate and I used a-england 'Lancelot' and, of course, piCture pOlish 'Cosmos' as the bases.
Déjà vu anybody? When I did my mani with piCture pOlish 'Blogger', I mattified it and, holy moly, it looked cool. I've never ventured into the land of matting glitter before, but I'm thinking this won't be the last time.
So I already said that the formula is amazing. As I said, it is incredibly forgiving. Absolutely zero trouble at al. It levelled out perfectly and as usual with a matte top coat, dried really fast. Speaking of drying really fast, the stamping worked perfectly using 'G'day Matte', but i did work really quickly so it would transfer before drying.
piCture pOlish is available from a whole bunch of places. Make sure you check out the piCture pOlish website, you can order this polish direct from them for $10 AUD or you can have a look at their list of distributors.
This product was provided for review. This is my personal, unbiased opinion.
For more information, see my disclosure policy.
Wednesday, June 12, 2013
Monroe - piCture pOlish (& a mini comparison)
Hi!
I hate when I don't post for a whole week! And I am sorry. Trouble is, at the moment I am posting what I wear and I haven't been wearing much so I have nothing spare to post. My exams start on Monday so polish has been staying on me for about 5+ days then I'll go naked for a couple of days and start again from there. Anyway, something that I'm glad I got to wear for as long as possible is piCture pOlish 'Monroe'. 'Monroe' is part of the Opulence collection.
Of all the piCture pOlish shades I've shown you so far, this is absolutely one of my favourites. That is a big call to make because I have really really loved pretty much all of them so far. These two photos show 'Monroe' in direct light (top) and in slightly less direct light (bottom). In bright light the holo particles, that I seem to constantly go on about, really come alive, but in less direct light, the depth of the burgundy is apparent.
'Monroe' is the most beautifully rich red wine colour. So incredibly elegant. I just wanted to get all dressed up while I was wearing this, but alas, I am wrapped up warm in a onesie studying ;) I love how the holo has the red undertone of the polish. It really glows - you can see in this photo on my index finger.
I just thought I'd pop this in here. On my pinky and middle fingers is the original 'Monroe' that piCture pOlish released before this reformulated version. When I heard they were remaking 'Monroe' I knew I had to get the original. It was the first piCture pOlish I ever owned and I love it as much today as the moment I got it. It is very different as you can see. The original version is a bit more red and the holo is totally different and much more subtle. If you have the original, I would definitely recommend getting the new version too. It is as gorgeous, but in a whole different way. For this photo, I have 3 thin coats on my pinky and 4 thin coats on my middle finger. You can see how much redder it is with one less coat.
'Monroe' was, as usual, really nice to apply. This is another one of the slightly more opaque ones and 2 coats gives perfect opacity.
piCture pOlish is available from a whole bunch of places. Make sure you check out the piCture pOlish website, you can order this polish direct from them for $12 AUD or you can have a look at their list of distributors.
I hate when I don't post for a whole week! And I am sorry. Trouble is, at the moment I am posting what I wear and I haven't been wearing much so I have nothing spare to post. My exams start on Monday so polish has been staying on me for about 5+ days then I'll go naked for a couple of days and start again from there. Anyway, something that I'm glad I got to wear for as long as possible is piCture pOlish 'Monroe'. 'Monroe' is part of the Opulence collection.
Of all the piCture pOlish shades I've shown you so far, this is absolutely one of my favourites. That is a big call to make because I have really really loved pretty much all of them so far. These two photos show 'Monroe' in direct light (top) and in slightly less direct light (bottom). In bright light the holo particles, that I seem to constantly go on about, really come alive, but in less direct light, the depth of the burgundy is apparent.
'Monroe' is the most beautifully rich red wine colour. So incredibly elegant. I just wanted to get all dressed up while I was wearing this, but alas, I am wrapped up warm in a onesie studying ;) I love how the holo has the red undertone of the polish. It really glows - you can see in this photo on my index finger.
I just thought I'd pop this in here. On my pinky and middle fingers is the original 'Monroe' that piCture pOlish released before this reformulated version. When I heard they were remaking 'Monroe' I knew I had to get the original. It was the first piCture pOlish I ever owned and I love it as much today as the moment I got it. It is very different as you can see. The original version is a bit more red and the holo is totally different and much more subtle. If you have the original, I would definitely recommend getting the new version too. It is as gorgeous, but in a whole different way. For this photo, I have 3 thin coats on my pinky and 4 thin coats on my middle finger. You can see how much redder it is with one less coat.
'Monroe' was, as usual, really nice to apply. This is another one of the slightly more opaque ones and 2 coats gives perfect opacity.
piCture pOlish is available from a whole bunch of places. Make sure you check out the piCture pOlish website, you can order this polish direct from them for $12 AUD or you can have a look at their list of distributors.
This product was provided for review. This is my personal, unbiased opinion.
For more information, see my disclosure policy.
Labels:
Burgundy
,
Holographic
,
Picture Polish
Wednesday, June 5, 2013
Peacock - piCture pOlish
Hey hey!
How are you all? I have another piCture pOlish to show you today. This time, I have 'Peacock'. I wasn't sure about this polish at first, but it has grown on me... Let's have a look at the pictures.
'Peacock' has a dark plum/purple jelly base and is pretty packed with glitter in green and what I think is silver. The "silver" glitter may be a pale pinky purple, but I can't work out if that's due to the the purple base or not.
I decided to try one coat of 'Peacock' over a few different colours. Left to right we have it over a-england 'Camelot', piCture pOlish 'Cosmos', OPI 'No Room For The Blues' and China Glaze 'Sweet Hook'. I quite like 'Peacock' over 'Cosmos' because the jelly base allows the amazing particles of 'Cosmos' to add to the intrigue of this polish. In saying that though, I do kind of like it over the two paler colours too. What do you guys think?
'Peacock' was really easy to work with. It is absolutely packed full of particles. The top photos show 3 thin coats of 'Peacock' on its own and as I mentioned, the last photo shows one coat over each polish.
piCture pOlish is available from a whole bunch of places. Make sure you check out the piCture pOlish website, you can order this polish direct from them for $12 AUD or you can have a look at their list of distributors.
How are you all? I have another piCture pOlish to show you today. This time, I have 'Peacock'. I wasn't sure about this polish at first, but it has grown on me... Let's have a look at the pictures.
'Peacock' has a dark plum/purple jelly base and is pretty packed with glitter in green and what I think is silver. The "silver" glitter may be a pale pinky purple, but I can't work out if that's due to the the purple base or not.
I decided to try one coat of 'Peacock' over a few different colours. Left to right we have it over a-england 'Camelot', piCture pOlish 'Cosmos', OPI 'No Room For The Blues' and China Glaze 'Sweet Hook'. I quite like 'Peacock' over 'Cosmos' because the jelly base allows the amazing particles of 'Cosmos' to add to the intrigue of this polish. In saying that though, I do kind of like it over the two paler colours too. What do you guys think?
'Peacock' was really easy to work with. It is absolutely packed full of particles. The top photos show 3 thin coats of 'Peacock' on its own and as I mentioned, the last photo shows one coat over each polish.
piCture pOlish is available from a whole bunch of places. Make sure you check out the piCture pOlish website, you can order this polish direct from them for $12 AUD or you can have a look at their list of distributors.
This product was provided for review. This is my personal, unbiased opinion.
For more information, see my disclosure policy.
Labels:
Glitter
,
Picture Polish
Wednesday, May 29, 2013
O'Hara - piCture pOlish
The piCture pOlish polish I have to show you today is the one that I think I was most excited about of all the shades I received. I have a rather large fondness for red polish. I love the feeling of wearing red polish. O'Hara is one of piCture pOlish's opulence shades and it is a stunner.
This is such a perfect red. A slightly blue based cherry red. It is so incredibly bright, but with a certain sophistication to it. 'O'Hara' also has those holographic particles running through it. I found they weren't quite as obviously holographic in this polish as they are in some other piCture pOlish shades, but I don't think this is a bad thing at all. They appear to give 'O'Hara' an added depth and catch the light in a way that fits just perfectly with this polish.
'O'Hara' is a jelly/crème polish and is more opaque than some of the other piCture pOlish shades I have reviewed. Similar to 'Kryptonite' in opacity, 2 coats was actually enough (though as usual you're seeing 3 coats on my swatching hand due to the nature of my lighting etc). Once again, the formula was really easy and this polish glided on with no trouble whatsoever. I'm still wearing 'O'Hara' as I type this and I REALLY don't want to take it off. I would say 'O'Hara' would be pretty high on my favourite ever polishes list (if I was ever to make one).
piCture pOlish is available from a whole bunch of places. Make sure you check out the piCture pOlish website, you can order this polish direct from them for $12 AUD or you can have a look at their list of distributors.
This product was provided for review. This is my personal, unbiased opinion.
For more information, see my disclosure policy.
Labels:
Holographic
,
Picture Polish
,
Red
Thursday, May 23, 2013
Kryptonite - piCture pOlish
HI!
I am so sorry for my lack of posts! I have one word... University! Gah... Anyway, I have the next in the series of piCture pOlish polishes to show you and this one is a outrageously beautiful! This is another collaboration shade and the collaboration this time was with Cathy of the wonderful blog, More Nail Polish.
MMmmmmm look at this mysterious beauty! 'Kryptonite' makes me think of a gorgeous wintry pine forest. So deep and rich and just plain delicious!
In some lights, 'Kryptonite' becomes brighter looking. I love how it's a super yellow based green but it doesn't make my fingers look weird and pink or otherwise strange coloured. I have to say, 'Kryptonite' is one of those polishes where you have got to see it in real life to understand the magic of it.
Just in case you've missed all my other piCture pOlish posts... here is another close up of the holo flakies that really makes these polishes. 'Kryptonite' is packed with these little particles and even though this polish is so deep and moody, the holo particles are really prominent.
'Kryptonite' is a bit more opaque than some of the others I've tried and 2 coats is definitely enough. These photos show 3 coats, but the last coat was almost entirely unnecessary. As usual, really really easy to apply.
piCture pOlish is available from a whole bunch of places. Make sure you check out the piCture pOlish website, you can order this polish direct from them for $12 AUD or you can have a look at their list of distributors.
I am so sorry for my lack of posts! I have one word... University! Gah... Anyway, I have the next in the series of piCture pOlish polishes to show you and this one is a outrageously beautiful! This is another collaboration shade and the collaboration this time was with Cathy of the wonderful blog, More Nail Polish.
MMmmmmm look at this mysterious beauty! 'Kryptonite' makes me think of a gorgeous wintry pine forest. So deep and rich and just plain delicious!
In some lights, 'Kryptonite' becomes brighter looking. I love how it's a super yellow based green but it doesn't make my fingers look weird and pink or otherwise strange coloured. I have to say, 'Kryptonite' is one of those polishes where you have got to see it in real life to understand the magic of it.
Just in case you've missed all my other piCture pOlish posts... here is another close up of the holo flakies that really makes these polishes. 'Kryptonite' is packed with these little particles and even though this polish is so deep and moody, the holo particles are really prominent.
'Kryptonite' is a bit more opaque than some of the others I've tried and 2 coats is definitely enough. These photos show 3 coats, but the last coat was almost entirely unnecessary. As usual, really really easy to apply.
piCture pOlish is available from a whole bunch of places. Make sure you check out the piCture pOlish website, you can order this polish direct from them for $12 AUD or you can have a look at their list of distributors.
This product was provided for review. This is my personal, unbiased opinion.
For more information, see my disclosure policy.
Labels:
Green
,
Holographic
,
Picture Polish
Subscribe to:
Posts
(
Atom
)


