Hi folks!
I've got a couple of nice neutral polishes to show you today. I'm just less than two weeks out from exams so the easy to apply, easy to photograph polishes have been popping up a bit more.
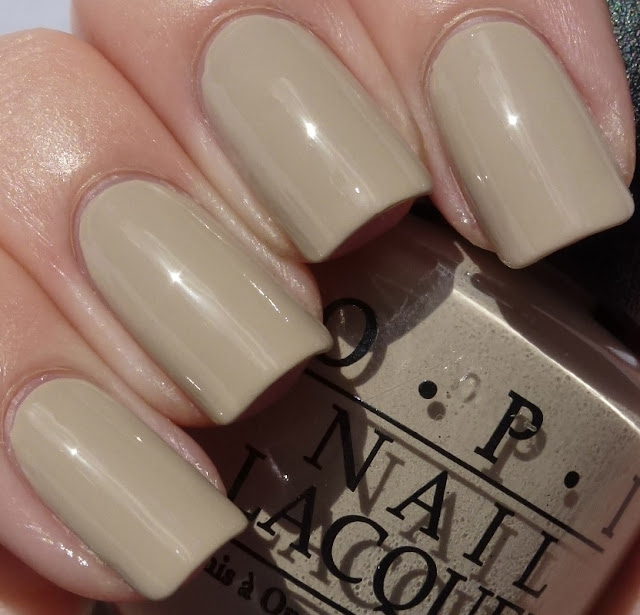
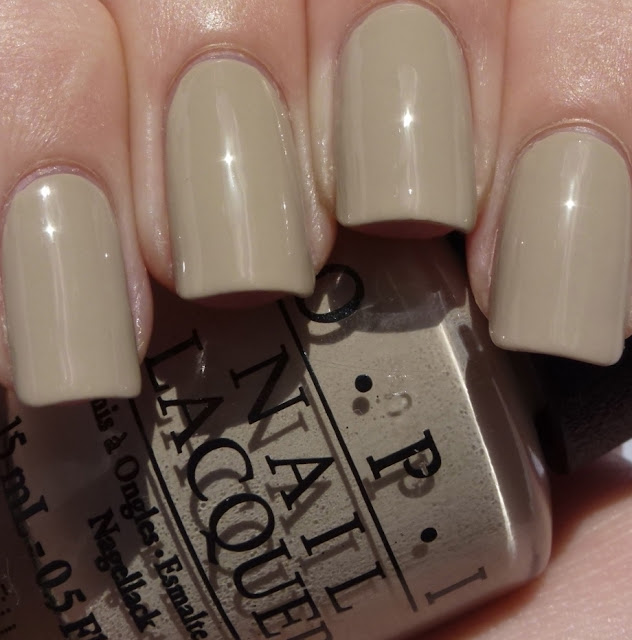
The first one I have to show you is 'Did You 'Ear About Van Gogh?' from OPI's recent Holland Collection.
'Did You 'Ear About Van Gogh?' is a nice camel/beige neutral crème. At first when I applied this, I wasn't in love as I looked pretty ghostly white, but I got used to it and ended up loving it.
I love the elegant simplicity of these types of shades. And so work-appropriate.
Next up, 'French Quarter For Your Thoughts' also by OPI. This polish came from their Touring America collection, released for Fall 2011...
I didn't realise just how close this colour was to 'Did You 'Ear About Van Gogh' until just now I put the bottles side by side and they look the same! On the nail they are actually quite different though. 'French Quarter For Your Thoughts' is an ever so slightly yellowed grey. I always thought this was a really clean grey but it's not quite.
I only have a mini bottle of 'French Quarter For Your Thoughts' and I could not make my fingers look right so I'm just holding Essie 'Good To Go' here. In indirect light, it looks much less like 'Did You 'Ear About Van Gogh' and much more grey.
'Did You 'Ear about Van Gogh?' is fairly easy, formula-wise, as far as neutrals go. I needed 3 thin coats. It's actually fairly opaque after two coats, but the third was needed in order to smooth everything out.
As for 'French Quarter For Your Thoughts', not so fun. I think this is solely due to the fact that it's a mini bottle and, therefore, has a ridiculously small brush. I'm not super experienced with these wee brushes so I couldn't seem to load enough polish on to the brush and if I did get enough on there, the polish seemed to pool at my cuticles. The moral of the story is that I'm pretty sure for a regular bottle, 2 coats would suffice, but for my silly bottle, three was needed to get it smooth and even.
For both of these I used a-england's 'The Knight' underneath and Essie 'Good To Go' on top.
Thursday, May 31, 2012
Monday, May 28, 2012
Master Chief - Dollish Polish
I woke up in the middle of the night last night and realised that I never posted this onto my blog yesterday! Oh dear! Study brain is in full swing. Well never mind, here it is now...
Today I have an absolutely gorgeous polish from indie brand Dollish Polish. I have always lusted after Dolly's beauties and just happened to check Twitter soon after she'd opened her shop one day and thought I'd see what was left. Needless to say 99% of the shop was sold out (as I came along around 30 mins after it had opened), but there was one or two things left. I managed to snaffle some mini bottles of this and that and then I saw a full-sized 'Master Chief' (part of the Gamer Series). I had never seen swatches of this or anything but I thought green = good, holo = GOOD so what could go wrong? Oh boy am I glad I got it!
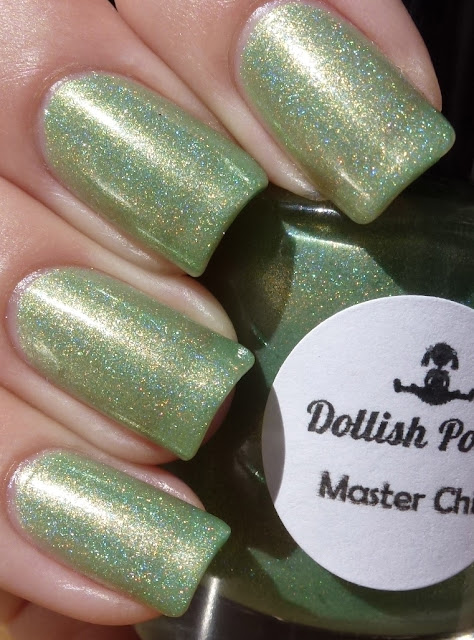
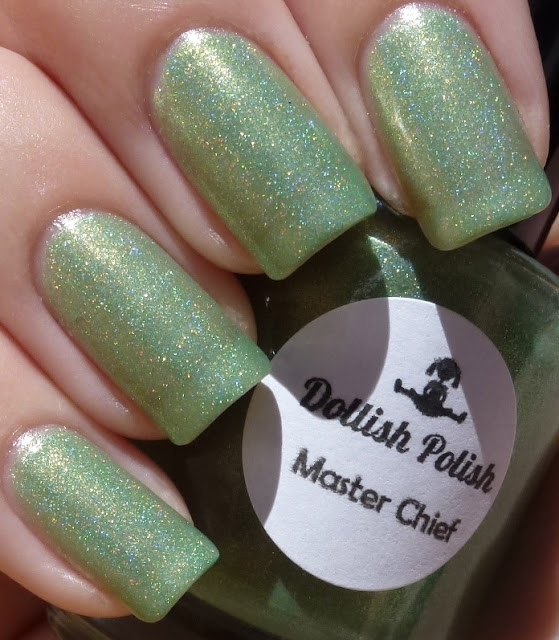
'Master Chief' is an amazing muted apple green with a scattered holo effect. You can see in this photo that there's a sort of gold duochrome going on too.
The holo is so pretty and the blue hues of the holo shine through beautifully against the green.
I think this is taken in cloudy sun (does that make any sense?). The scattered holo is so pretty! You can see a tiny bit of VNL in this photo, but it wasn't really visible at all in real life.
In certain light (eg lower light like this photo), you get this awesome coppery flash. It was so hard to capture, but was actually quite noticeable in real life. You can just see a tiny bit of it happening on my pinkie finger.
Just one last pretty photo. Got a bit of the gold and copper flash mixed in here. MMMMhmmm I love this polish!
This polish was a little bit sheer to start with but it builds quite nicely. This is just three thin coats and like I said earlier, you can still see a little bit of VNL in some of the photos but that wasn't a problem in real life. 'Master Chief' was perfectly thin and spread really easily without any pulling or pooling at my cuticles.
Dollish Polish is available from here, most things are out of stock right now but I just checked and at least some of the polishes from her newest collection 'Dolly Does Polish' are available.
Labels:
Dollish Polish
,
Green
,
Holographic
,
Indie

Thursday, May 24, 2012
Princess Tears - a-england
I am just gonna cut straight to the chase today because I cannot wait another second to show you this beauty! Never mind my line of things to be posted, this had to be shown right away. This is 'Princess Tears' from a-england's 'The Legend' collection.
Each time I put on one of Adina's a-england beauties, I think to myself, it cannot be possible that there is a polish more beautiful, that I could possibly love more (think Bridal Veil)... Well, it turns out there is... 'Princess Tears' is the most jaw-droppingly beautiful polish and, right now, more loved by me than much else I can think of...
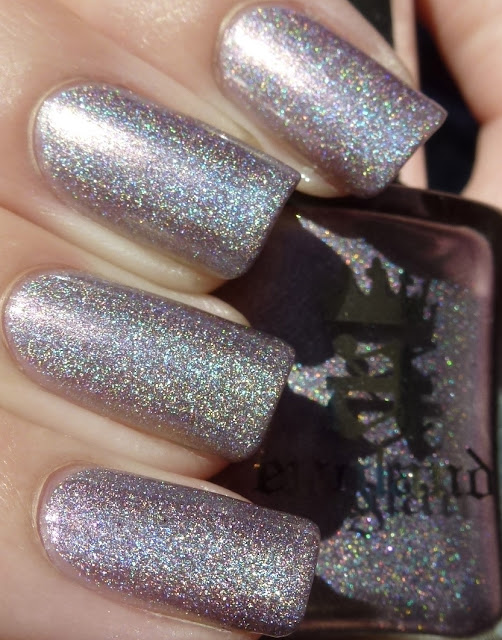
Let's start with the holo. It has a gorgeous subtle linear holo effect. I just want to be clear that when I say "subtle linear", I don't mean that it isn't obvious, because it really is in most light.
Add to that a duochrome effect and we have a winner! The duochrome was really hard to capture but it too is really quite obvious in real life. It shifts from a gorgeous pinky-lilac to a steely purple-grey.
Here you can see a tiny bit of how the duochrome effect plays in full light, with each nail appearing slightly different. At times, the edges of the grey even appears ever so slightly green.
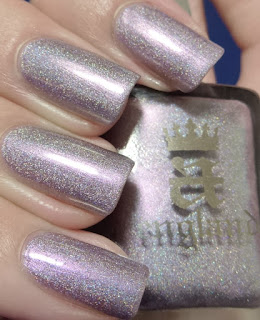
In slightly lower light, a lavender/silver veil is cast over this princess, softening her ever so slightly.
But by far my most favourite part of 'Princess Tears' is this surprisingly bright pink/purple flash that lights up my nails. I didn't expect this to be so vibrant and on top of that, it's not at all shy and jumps out in all lights in real life. The one thing is, that I could not for the life of me capture its true splendour. It's just one of those things that you will have to take my word for, or preferably see for yourself!
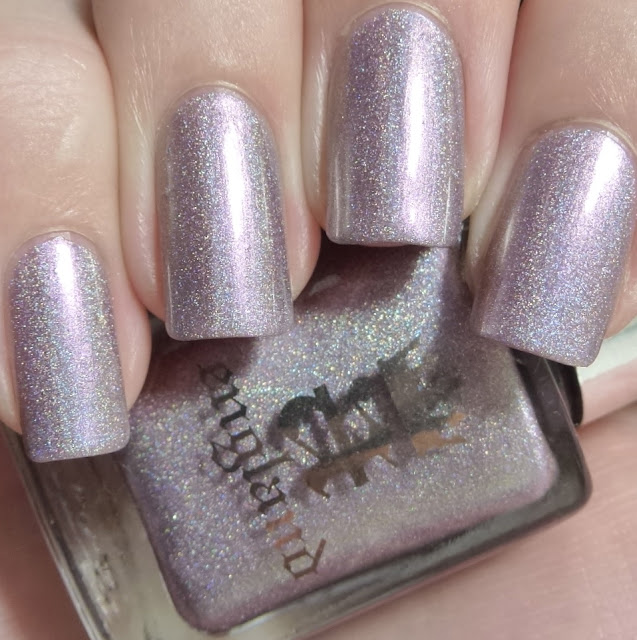
Another glimpse at the flashes of pink. It forms stripes of colour down my nails and I keep imagining that this is the streak of the princesses tears.
A quick macro and you can see that 'Princess Tears' is jam-packed with those holo particles that I love so much.
First up, I have to give a word of warning... 'Princess Tears' is super distracting and that's pretty dangerous in the last few lectures before exams. It also doesn't bode well for me focusing on studying for said exams.
As to the formula... Once again, Adina has made a perfect colour all the more perfect by giving it a foolproof formula. I had read that this was a 3 coater and I was all prepared to do that, but no, 'Princess Tears' surprises me once more with only needing two oh-so-simple coats. I used 'The Knight' base coat and 'The Shield' on top and had zero issues with dragging or any other holo related problems one might imagine.
So the message for today... Actually there's two... If you have this pretty, don't take as long as I did to try it (in my defense, I was waiting for the perfect weather to capture all its glory) and secondly if you don't have this pretty... Get your butt over to a-england's website and order it because it's only £9 and the ever-generous Adina still has free worldwide shipping! Well, what are you waiting for?
Monday, May 21, 2012
No Room For The Blues - OPI
Today... 'No Room For The Blues' from OPI's Bright's collection, aka the polish that made me fall back in love with crèmes all over again.
I have always loved crème polish in a big way and I've generally not been a fan of glitters. But recently I have not been able to get enough of glitters and shimmers and all things shiny that my poor crèmes have been all but forgotten. Well this polish made me remember exactly why I love crèmes... Look...
This is the most wonderfully happy blue that I own. Such a summery colour that reminds me of a sparkling swimming pool. This is taken under artificial light because I put it on at stupid o'clock at night.
This photo was taken the next day under indirect sun. I love how pure crèmes are, there's no extra distractions in 'No Room For The Blues' and let's face it, it doesn't need any!
What can I add to this... How bout the fact that 'No Room For The Blues' formula also reminded me just how much I love crèmes. The buttery polish to rule all buttery polishes in the best possible way. It's spread itself onto my nails in 2 perfect coats. The first coat was basically opaque so the second coat just made everything so glossy and perfect. So I guess the message is... I'm so sorry I ever forgot you my crèmes and I look forward to seeing you again soon :)
And just in case you other kiwis feel that you need to have this happiness in your life... Hop on over to Candy Girl or maybe pop into Farmers or your local pharmacy or where ever else you buy your OPI's!
Thursday, May 17, 2012
Congeniality Is My Middle Name - OPI
It is certainly getting cold here! No doubt winter is on the way. And with that comes a serious lack of sun to take pictures in.
Anyway for now, I have 'Congeniality Is My Middle Name' from OPI. This was released as part of last years Miss Universe collection. Originally I didn't get any of the polishes from this collection, but I noticed this at a cosmetics sale thingy and thought "why not?".
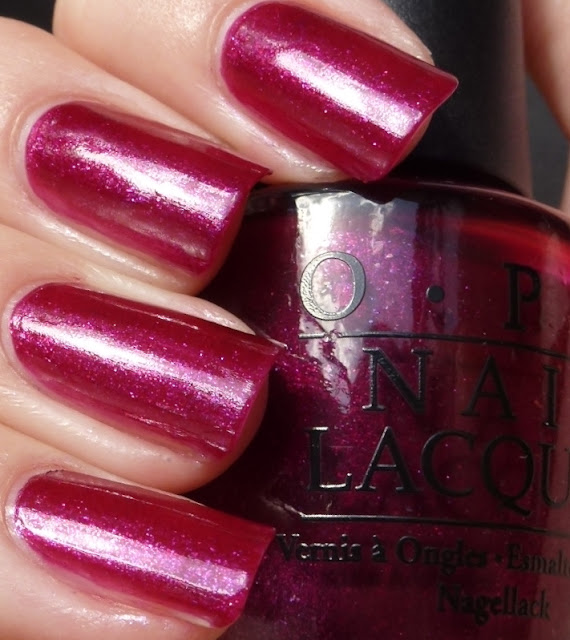
'Congeniality Is My Middle Name' is absolutely gorgeous. So vibrant. It's difficult to put my finger on what to actually call this colour...
It's a sort of a dark pinky, fuschia, berry kind of colour, leaning ever so slightly red.
'Congeniality Is My Middle Name' has a bunch of awesome purple shimmer in it, but here's the thing... This shimmer settles SO fast to the bottom that it's a little ridiculous! It had been sitting in my box for a month or so and it had settled to the bottom so much that I thought it didn't have any mixing balls in it because they were stuck in the shimmer! It took a good 10 or so minutes of shaking before I could use it (not ideal if you ask me).
Here's what the bottle looks like in less than a week. The purple shimmer definitely contributes a lot to the colour of this polish, as the base colour is actually quite dark and quite red.
The formula was really easy to work with. This is two coats and once the shimmer was mixed in, it acted just like any other shimmer polish. At the end of the day, I'm not too worried about the mixing problem because once it's mixed it's fine, but also, once it's on your nails... None of that even re-enters your mind, because your nails look super pretty!
For the kiwis, this is available on Candy Girl. I don't think this collection came to the regular shops (Farmers etc) but I could well be wrong about that.
Monday, May 14, 2012
Coral Comparison
It's that time again, comparison time. This time I will show you a little coral comparison. I love corals. I think a good coral can look good on anyone, but I have to say I have a few that seemed to look a little similar... and I was kind of right about that. I'll let you see for yourself...
These photos are with base coat but without any top coat.
From left to right: Pinky - OPI 'Big Hair... Big Nails', ring - OPI 'Red Lights Ahead... Where?', middle - OPI 'My Chihuahua Bites' and index - Essie 'Peach Daiquiri'.
As you can see there aren't any dupes here but they are all fairly similar. The main difference of course being that 'Big Hair... Big Nails' is a jelly so will naturally look a bit different.
'Red Lights Ahead... Where?', on my ring finger, seems to lean a little more red than the others and 'Peach Daiquiri' on my index finger, a little more pink/salmon. I think 'Red Lights Ahead... Where?' is such a perfect colour. Really should wear that as a full mani sooner rather than later, I'm thinking.
I just had to show you this one last photo as this is one coat of each of the crème polishes. The two OPI's here are completely opaque in one coat and Essie 'Peach Daiquiri' is not far behind. I love these kinds of polishes because it means my second coat can just be there to shine everything up and fix any funny cuticle goings on :)
To the formula... The top two photos are showing two coats each of 'Peach Daiquiri', 'Red Lights Ahead... Where?', and 'My Chihuahua Bites', with three coats of 'Big Hair... Big Nails' (not bad for a jelly)! These polishes were all so easy to work with (see the one coat photo!). The only one that nearly caused me a tiny bit of grief, was 'My Chihuahua Bites'. It's one of my older polishes and has thickened up and tends to separate. Nothing that's not fixable with a few drops of thinner though, I'm sure. Anyway, I hope this helped someone and if not I hope you liked looking at these pretty polishes all lined up :)
These polishes are all currently available. For the kiwis, the three OPI's are available on Candy Girl for $18.95 (or of course at Farmers etc for around $26.90) and I got the Essie polish from Smith and Caughey (I got it in their sale for super cheap ($12 or something) so I'm not sure how much they are normally.
Friday, May 11, 2012
Gradient Nails
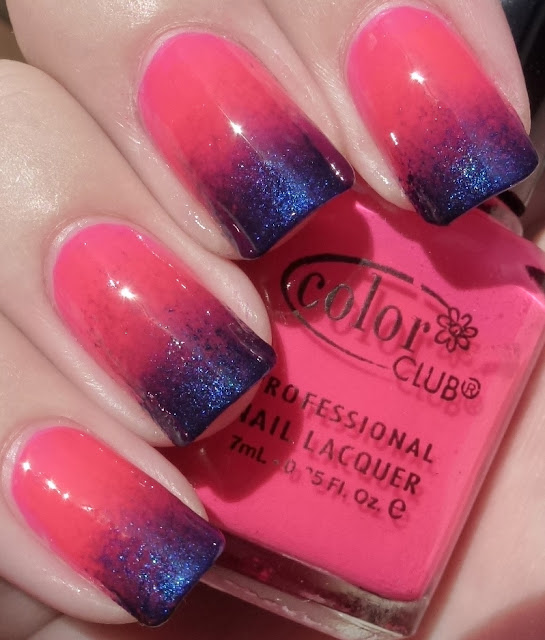
So I have my first attempt at proper gradient nails to show you today :) I've always loved the look of gradient nails but I haven't really ever thought I could pull them off. I have dabbled in sponging a bit of glitter on my tips but that's about as far as I've gone. Until....... Sammy from The Nailasaurus posted this amazingly easy to follow tutorial... As un-creative as I think I am, I actually figured maybe I could manage this. So here we go, this is my take on gradient nails...
I wanted to use colours that were very different and do something nice and bright. What better than neon pink and navy. The pink I used is Color Club's 'Warhol' and for the navy, I used OPI's 'Yoga-Ta Get This Blue' (one of my favourites!!).
As usual, the neon was near impossible to capture colour-corectly, but this photo is pretty close. 'Warhol' is a super bright, saturated pink. I love the shimmer in 'Yoga-Ta Get This Blue' too.
While I was wearing this mani, I got some SWEET nail mail from Ninja Polish. I ordered Nail-Venturous 'Floam' and 'A Dash of Princess'. Naturally as soon as they arrived, I had to try one of them and surprisingly it was 'A Dash of Princess' that really piqued my interest. Well, I gotta say, I LOVE this polish!
'A Dash of Princess' is absolutely packed with a mix of large and medium hex glitters in pink, white and some sort of pearly ones (see my ring finger tip), as well as little wee pink hex glitters. Love, love, love! I don't know what else to say but just that, I love it!
I'm not even going to start to tell you how I did this because if you haven't already, you should all head straight over to Sammy's blog because she explains it all brilliantly. And while you're there, check out the rest of her blog, she is basically freaking awesome at all things nails, especially when it comes to nail art.
As to the formulas, 'Warhol' is pretty easy to work with. I used two coats and it was ever so slightly see-through at the tip, but that was OK because the navy was going on top. 'Warhol' does dry matte (usual for neons) so top coat is definitely necessary, but to be honest, you'll be needing top coat to smooth out the sponging anyway. 'A Dash of Princess' was also really easy to use. Sometimes these sort of glitters can be a pain, but this is so dense that you get heaps on the brush and it's pretty easy to place the pieces where you want them.
I absolutely loved sporting this look and I definitely will be trying this again. I got so many comments on it too :) Most of all, thanks Sammy for making that tutorial. I love that you've created such a monster with it. Gradient nails are taking over since that post and I love it!
Labels:
Color Club
,
Glitter
,
Gradient
,
Indie
,
Nail-Venturous
,
Navy
,
Neon
,
OPI
,
Pink
,
Shimmer

Subscribe to:
Posts
(
Atom
)
