Showing posts with label Striping Tape. Show all posts

Monday, July 29, 2013

piCture pOlish Blog Fest 2013 - Celebrating the Year of the Blogger!

Hi everyone!

I'm really excited to to be a part of piCture pOlish Blog Fest 2013! The brief was to create some nail art using 3 shades supplied to us by the lovelies at piCture pOlish. It's doubly exciting because there are 3 awards available, with the prizes being the opportunity to make a collaboration shade with piCture pOlish. The 3 prizes are chosen by 1) the fans and friends of piCture pOlish, 2) the participants of blogfest and 3) the girls of piCture pOlish (Jules and Megs). You can vote on your favourite nail art creation by hopping over to piCture pOlish on Pinterest and voting. Update: You can go to the piCture pOlish website to vote. But hurry, because it only runs till the end of tonight (NZ time).

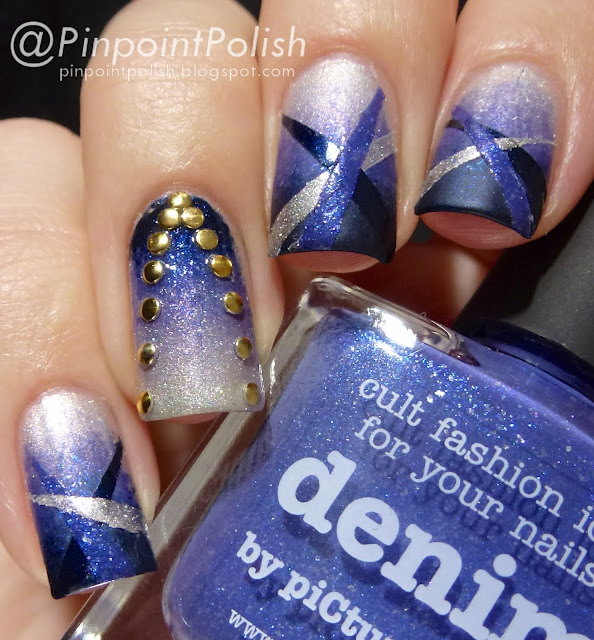
The 3 shades I got were 'Atomic' (a collaboration shade with the super talented Sarah from Samarium's swatches), 'Denim' and 'Electric Blue'. This is the look I came up with...


Picture Polish, Blog fest 2013, nail art, atomic, electric blue, denim
As soon as I saw 'Atomic', 'Denim' and 'Electric Blue' together, they absolutely screamed gradient. They work so beautifully together.

Right, let's get on with how I went about getting this look...


First, I painted my nails with strengthener and base coat, followed by one coat of 'Atomic'. Once dry, I taped off my cuticles in order to make clean up a little easier later on.


Next, I painted a generous line of 'Denim''Atomic' and 'Electric Blue' on some wax paper. Using a tooth pick I swirled the adjacent colours together just a little bit, mixing 'Denim' out slightly to each side. I dipped the sponge into the polish, tapped it lightly on the wax paper, then sponged on to my nail moving up and down my nail with very small motions to ensure a smooth gradient.
I have to thank Sammy from The Nailasaurus for this particular technique! You can check out her original tutorial here. 


I repeated the sponging steps 3 times, ensuring the previous coat was completely dry each time. After that, I cut the tape off and cleaned up around my cuticles using an angled brush and pure acetone.


This is the cleaned up gradient and at this point it doesn't look very smooth. I slapped on a coat of quick-dry top coat and then once dry I used a coat of piCture pOlish 'G'day Matte' (matte top coat) on all but my ring finger. On my ring finger, I used a second coat of my regular top coat.


I waited until my nails were entirely dry and set before I went near the taping part. In fact, I did the taping part the next day. Using Magic Tape, I masked off the lines to taper near the cuticle end. You could use striping tape here, but as I show you my dominant hand (I have to do all this with my left hand), I used full tape so I wouldn't go over the edges.


Wait for the previous stripe to dry and set COMPLETELY before taping off the next one. I can't stress this enough, because they will pull off with the tape otherwise and you don't want to have to do the whole gradient over again. Paint the stripes (I used 2 thin coats for 'Denim' and 'Atomic') and carefully pull the tape off - preferably while the stripe polish is still wet. I repeated this whole process, with lots of drying time in between, to get 3 stripes on each nail.


To finish up, I added some studs to my feature nail, just sticking them on by dipping a tooth pick into top coat, dabbing it on my nail and then using the tacky toothpick to pick up and place each stud. I spaced them in a way that mirrored the gradient effect on my nails.


Picture Polish, Blog fest 2013, nail art, atomic, electric blue, denim
Phew, so this is it. I quite liked the way the gradient looked once matte, with the shiny stripes on top. What do you think?


You can check out everyone else's manis by checking out #ppblogfest2013 on twitter and instagram. Also make sure you are following piCture pOlish. They can be found in lots of different places - Facebook     Twitter     Pinterest     Instagram    You Tube    Google +.

piCture pOlish polishes can be purchased directly from Australia (check out their Everyday Deals page too), or visit their network page so you can find a distributor closer to where you live.


These products were provided for blog fest 2013.
For more information, see my disclosure policy.
Wednesday, March 13, 2013

Polish Days: Vintage

It's Polish Days time again! For the first time since I started participating in Polish Days, I really struggled with the theme. This month's theme is Vintage... Hannah suggests that you could take the theme to mean using a vintage polish, or taking a decade or trend or anything really, so long as there is some connection with the past as your inspiration. Seems easy enough right... Wrong! I could not think. I often do stamping that reminds me of old-fashioned wallpaper etc, but I wanted to do something different and as I always use Polish Days as a way to make sure I do some nail art, I didn't want to just swatch a vintage polish. In the end I googled the word vintage and this is what I came up with..,


This totally reminds me of an old-fashioned day at the beach. I actually really like the way this turned out with the stripes and everything.


This was my inspiration image. As I was scrolling down through google images, I instantly fell in love with this and knew I wanted my mani to come from this.


Here are my nails pre stamping. I love the stripes. Please excuse the fact that only two of my nails are top coated! I'm not sure why I thought it was a good idea to take photos before I did the other two??

Polishes I used were OPI 'My Boyfriend Scales Walls' as the base on all nails. I did the stripes using striping tape from Born Pretty Store with OPI 'Steady As She Rose' and China Glaze 'Aquadelic'. My ring finger was stamped using BM-309 with a-england 'Galahad' and BM-09 with Essie 'School of Hard Rocks'.

Thanks Hannah for another great Polish Days! Make sure you check out what all the other lovelies have made of this theme...

Wednesday, December 5, 2012

Polish Days: Bling

It's that time again... Polish Days time. To be honest with you, I thought I had till the 6th (which would be the 7th here in NZ and suddenly I realised that the 4th was the actual date, so late last night I got to it and came up with this...


Polish Days: Bling
It's not really at all what I had in mind for this Polish Days, but I think it turned out ok given that it was a bit rushed. I used a-england 'Camelot' as my black base and Sally Hansen 'White On' as the white base. On the pinky finger is a couple of coats of Chi Chi 'Disco Diva' (which does NOT want to sparkle properly on camera!) and on top of that on my index finger is a coat of Cult Nails 'I Got Distracted'. I also used my little gold studs from the Born Pretty Store and some sticky little gem things that I got from the scrap booking section at The Warehouse.


Well, hopefully next time I can be a little better organised for Polish Days. Also, just to finish this little post, I would like to say congratulations to Hannah from Polly Polish and to her Mr who got her the most GORGEOUS ring that could inspire this month's theme.

P.S. this is my 100th post! WOO. Thanks to everyone who reads my little blog :)

Wednesday, November 7, 2012

Polish Days: MAN-icure


My first Polish Days! I'm very excited to have finally joined up with this awesome idea. This months theme is MAN-icure in tribute to Movember. I instantly knew what my MAN-i would have to be, as it is something that I get teased about loving, due to its manly nature (according to my friends). One of my big loves in life is Formula 1, namely Sebastian Vettel.


Formula One Nails, Polish Days
For those of you that don't know, Vettel is the current world champion, having won the championship for the last two years in a row, so he is car number 1. The 1 on my ring finger is the one on his RB8 (car) this season. The water marble is taken from the Red Bull colours (his team).


This is a quick snap of my Red Bull cap. Unfortunately I got this before Vettel won the championship the first time so it has number 5 on it. Anyway you can see the colours of the team there nicely.

The final MAN-i that you have just seen was actually attempt number two... I originally wanted the bright yellow from the nose cone of the RB8 in the water marble, but it didn't quite work as I had wanted...


Formula One Nails, Polish Days
As you can see, the colours all sort of muddied together. Much as I don't hate this, I am glad I redid the two nails. I love how the F turned out in the top one anyway.


I used a whole lot of polishes for this MAN-i...
a-england - 'Excalibur' & 'Camelot'
OPI - 'Red Lights Ahead... Where', 'I'm Not Really A Waitress', 'Yoga-Ta Get This Blue', 'No Room For The Blues', 'The 'It' Color'
Nicole by OPI - 'Listen To Your Momager'
Sally Hansen - 'White On'
Konad - Special White

If you have any questions about what I used where, please leave a comment and I'd be happy to tell you more :)

For the middle finger I used LeaLaC XL - B stamping plate and for my ring and pinky finger I used striping tape to get all the lines nice and straight.

I had lots of fun doing this MAN-i and it actually served as the perfect distraction to take my mind of the pain in my tummy while I was sick :)

If you want to sign up for the next Polish Days, hop over to Polly Polish for information.

Thursday, July 5, 2012

Striping Tape Mani... Camelot - a-england & Aurora Borealis - Dollish Polish

True to my word, I'm busy trying my hand at different types of nails and todays... Striping tape. I recently bought a whole lifetime worth of striping tape from the Born Pretty Store for $8.99 USD and I gotta say I really enjoyed this mani a lot too!


Aurora Borealis, Dollish Polish, Camelot, a-england, Stripping Tape
For this mani, I used 2 coats of Sally Hansen 'White On', I then added the striping tape in the design that you can see, next I added 1 awesome coat of a-england 'Camelot', pulled the tape off and topped everything off with one quick coat of Dollish Polish 'Aurora Borealis'. Please excuse the tip wear you can see here - I'd already worn this for around a day and a half and I didn't wrap the tips with black (knowing me and my butter fingers, I would've got black all around the pretty white lines!)!


Aurora Borealis, Dollish Polish, Camelot, a-england, Stripping Tape
Holy duochrome batman!!! 'Aurora Borealis' is so incredibly GORGEOUS!! look at the duochrome action!


Aurora Borealis, Dollish Polish, Camelot, a-england, Stripping Tape
You can see the electric tealy blue that shines through in this photo...


Aurora Borealis, Dollish Polish, Camelot, a-england, Stripping Tape
Now see the purple! Serious love of this polish right now!


Aurora Borealis, Dollish Polish, Camelot, a-england, Stripping Tape
And still the colours keep changing! My index finger shows how pinky 'Aurora Borealis' can appear. I love how my index finger has its own little gradient thing going on in this pic :)


I loved wearing this mani and I really liked the contrast between the black and the white. I won't bore you with details about the formulas because to be honest, they were all great. I just recently purchased Sally Hansen 'White On' because I've never had much luck with my only other white polish (OPI's 'Alpine Snow'), 'White On' is really really thin but it's certainly easy enough to work with. The only thing I had a bit of trouble with, was that the striping tape seemed to leave little marks on the white polish. Not so obvious in real life though as they appear in theses photos. Anyway, overall fairly successful I think :)