Showing posts with label Glitter. Show all posts

Thursday, December 11, 2014

Takko Lacquer – Physical Graffiti

Press Sample

Hi!

I have nearly grown out all my breaks! Fingers crossed I don't get any more now. Another update, I have busted my wrist, so typing is not super easy right now so I'll just get right on with the pics.


Takko lacquer, Physical graffiti, swatch

Takko lacquer, Physical graffiti, swatch
'Physical Graffiti' is a grey polish with irregular silver flakes of glitter. So simple, but the irregular glitter makes this polish really interesting. I love the soft look that the slight jelly finish gives 'Physical graffiti'.


Because 'Physical Graffiti' has a slight jelly finish, it is slightly less opaque – in saying that though, I only needed 3 coats to get full opacity and the glitters are still really visible. I think the formula is spot on in that respect.


Make sure you check out Sheryl's blog to find out about the inspiration behind her polishes, along with other updates. Also keep an eye on Takko Lacquer's twitter and instagram for info about restocks etc. Takko Lacquers are sold from their own shop, but only with US shipping. For us international ladies, Takko lacquers are stocked at LlaroweFemme Fatale and Mei Mei's Signatures.

Saturday, September 13, 2014

Take A Chill Pill - Dollish Polish (with a splash of stamping and a gradient)

Hi!

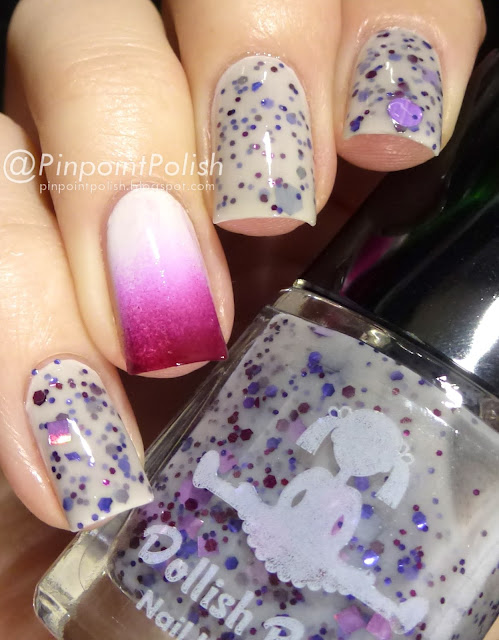
I have a quick post with some nails that I did a while ago now. I quite like how it came out though so I figured it's about time I posted it. This look is mainly featuring Dollish Polish 'Take A Chill Pill' from her 'That's So 80's' collection.


Dollish polish, Take a chill pill, swatch, bundle monster BM 422
'Take A Chill Pill' is a polish that I really like, but I'm slightly confused because looking back at pics from when this was released it was bright blue… As you can see my bottle has a very sheer blue-grey jelly base, packed full of all sorts of glitter. Strange - I will investigate further. Oh well, like I said, I love it.
On my ring finger I did a gradient using Color Club 'Wicked Sweet' and China Glaze 'Sun-Kissed' and then stamped on top using Bundle Monster plate BM-422 and Color Club 'Beyond'.

Unfortunately this polish is not currently available, but head on over to Dolly's Big Cartel shop because there is bound to be some other beauties that you'll want instead. Make sure you follow Dollish Polish on her various social media sites to keep up with updates (FacebookTwitter and Instagram).

Thursday, September 4, 2014

piCture pOlish - Imperial

Hellooo!

I have a freaking gorgeous polish on here tonight. This is 'Imperial' that was made in collaboration with the wonderful Jeanette from The Swatchaholic. I purchased this a little while ago and have worn it several times, each time trying to capture it accurately. Let's just say this is not an easy polish to photograph, but here we go anyway…


Imperial, picture polish, swatch

Imperial, picture polish, swatch
'Imperial' is such a beautiful royal purple colour. Just the right amount of red and blue to make the most perfect, saturated purple. As you may or may not know, I don't tend to wear much purple polish (no idea why, just a random thing), but I cannot get enough of this beauty. The gold shimmer and irregular flakes in it make it even more beautiful and complex. What an amazing job all these girls have done to make such a beauty - definitely an absolute favourite of mine.


'Imperial' is lovely to work with. 2 coats is all that is needed for full opacity. One thing to keep in mind is that this polish dries slightly matte, so top coat is a must (though in my opinion that is always the case!).


piCture pOlish is available from a whole bunch of places. Make sure you check out the piCture pOlish website, you can order this polish direct from them for $10 AUD or you can have a look at their list of distributors. You can also find piCture pOlish on instagramtwitter, facebookpinterest and YouTube.

Wednesday, July 16, 2014

Girly Bits - Into The Night

I have an oldie but a goodie to show you tonight. A polish that I've had for a long time now, I think this was one of my earlier indies, this is Girly Bits 'Into The Night'


Girly Bits, Into The Night, a-england Perceval, swatch

Girly Bits, Into The Night, a-england Perceval, swatch

Girly Bits, Into The Night, a-england Perceval, swatch
This is such a beauty. I have 2 coats of 'Into The Night' over top of a-england 'Perceval'. This polish is often put over various dark colours and it looks wonderful, but this is my most favourite combination. It makes the most beautiful blackened red, and then with those holographic particles… MMMMMmmmmm. Such a seductive combo - can I even say that about 2 nail polishes and have it make sense?


As I mentioned, I used this polish as a topper using 2 very thin coats which is how I like to use it. The blackened base is fairly sheer though just giving a black cast to whatever it is layered over if thin coats are used. It can be built up to full coverage with more coats. The holographic glitters are packed in to the polish and so apply really easily to the nail.


Girly Bits polishes are available through a number of websites so make sure you check out this list of distributors to see which ship to your location. You can follow Girly Bits on Facebook, Twitter, Instagram and Pinterest to keep up with the latest news and swatches etc and of course the Girly Bits blog too. 'Into The Night' is currently in stock on the Girly Bits website at the time of writing this post so hop over there and grab it.

Saturday, June 14, 2014

I'll tumble For Ya - Dollish Polish (+ Gradient)

Hello!!

I'm half way through my exams! WOOHOO. Today I have a little mani to show you that I wore for about the last week. I haven't worn a glitter for ages (I don't have time for the removal process), but I was really feeling like wearing one. So naturally I had to look in my Dollish Polish drawer in my helmer. I came out with 'I'll Tumble For Ya' and thought I might do a gradient inspired by the glitters like I did for some of my last few Dollish Polish posts (here, here and here). So here you go…


I'll Tumble For Ya, Dollish Polish, swatch, gradient OPI

I'll Tumble For Ya, Dollish Polish, swatch, gradient OPI
I love 'I'll Tumble For Ya' so much. There's something about white polish that is just so clean. The glitter colours in this polish are just so perfect together too. For the gradient I used Avon 'Strawberry', OPI 'No Room For the Blues' and OPI Greenwich Village'.


I used 3 coats of 'I'll Tumble For Ya'. As you can see in the bottle there are stars and bigger glitters, these didn't wanna come out and play too much and I couldn't be bothered fishing too much so I just made do with exactly what came out on my brush - I don't mind that it's slightly more subtle. The formula was really easy to work with though and really opaque too.


Head on over to Dolly's Big Cartel shop because I've just checked and this polish is in stock right now. Make sure you follow Dollish Polish on her various social media sites to keep up with updates (Facebook, Twitter and Instagram)


Hope you are all doing well and I will see you on the other side of my exams next week :D

Saturday, May 17, 2014

Beatrix - Zoya

Hi all!

So I am clearly still working on this whole blogging and life thing. Bear with me, I will eventually learn how to juggle this. Anywho, let me show you what I am wearing. Yet another PixieDust - these are just too perfect when I'm busy because of the awesome wear time.


Zoya, Beatrix, Pixie Dust, swatch

Zoya, Beatrix, Pixie Dust, swatch
This is 'Beatrix' and ooooooo Mama she is a stunner. I have had so many comments on this polish since wearing it! The shade of orange of 'Beatrix' is not just a regular orange. It's a soft orange in some ways, but the gold glitters make it such a vivid eye-catcher (I am fully aware that I don't make a lot of sense). Love it!

'Beatrix' was ever so slightly less opaque than a lot of the PixieDusts I have tried in the past, but 2-3 coats was still enough for full opacity. As usual, 'Beatrix' was a breeze to apply and is wearing very well.

Thanks for popping by!

Thursday, May 8, 2014

Zoya – London

Hi!

Guess what… I have my graduation ceremony tomorrow! I'm so excited to get all dressed up and celebrate with my family and friends. The Boy graduated on Monday and I was so proud!

Anyway, I have another quick post on what I've been wearing for about the last week. This is Zoya 'London'.


London, Zoya, Pixie Dust, swatch

London, Zoya, Pixie Dust, swatch
More PixieDust love from me. What's new? So I'll keep it short. I love 'London' in all the ways. I love the shade of grey (hehe) of it. It reminds me of concrete - but with added sparkly goodness.


'London' was really easy to use, as with all the other Zoya PixieDusts I have tried so far. It was nicely opaque with only 2 coats needed for full opacity and to get a good texture.

Thursday, May 1, 2014

Zoya - Chita

Hi hi!

I have a super dooper fast post today as I'm currently in bed sick. I would just like to show you what I am wearing at this moment. I am back to wearing Zoya Pixie Dusts because I simply can't get enough of them. This is Zoya 'Chita'.


Chita, Zoya Pixie Dust, swatch
I love 'Chita' for many more reasons than I can even list. Basically, you all need this polish. 'Chita' is a beautiful forrest green with silver micro glitter in it. So, so much love for this polish.


'Chita' is super easy to apply and is beautifully opaque. I barely needed more than one coat, but I added a 2nd coat for the texture as much as anything. This polish was a little thick, but completely workable. Pure gorgeousness in a bottle :)


Thanks for popping by! And thanks Mimi for helping me get my hands on these babies <3

Saturday, March 29, 2014

Godiva - Zoya

Hello!

I have another quick Zoya Pixie Dust post today. This time, it's Zoya 'Godiva'


Godiva, Zoya Pixie Dust, swatch
'Godiva' is a gorgeous nude Pixie Dust. It is pulling ever so slightly too yellow in this photo. It is reasonably close to my skin colour in real life, but the texture and the micro glitter in it stop my hands from looking too mannequin-y.


'Godiva' was a little bit sheer at first but it built up well. I used 3 thick-ish coats for full opacity.


As usual, thanks for popping by :)

Tuesday, February 11, 2014

Vodka & Caviar - OPI (Jelly Sammy)

Hi all!

Life is still crazy and busy and strange, but that's for another place, so instead let's just go straight to what's currently on my nails. I haven't done a jelly sandwich in a long time and it's just what I felt like doing recently…


OPI Vodka & Caviar, CrowsToes Maxxed Out, Jelly sandwich, swatch
This is OPI 'Vodka & Caviar' which was one of my earliest polishes (before I became crazy-polish-lady). I have always had a love for red polish, I think there are few things more wonderful than perfectly manicured red nails. I've been meaning to try this polish as a jelly sammy for a long time and I'm glad I finally did. I did 2 coats of 'Vodka & Caviar' followed by 1 coat of CrowsToes 'Maxxed Out' (aka my favourite glitter EVER!) and then 1 more coat of 'Vodka & Caviar'.


Both these polishes are easy to work with. 'Vodka & Caviar' is naturally a little sheer (being a jelly), but it builds really nicely and 3 coats was more than enough for full opacity (as seen on my ring and index fingers). 'Maxxed Out' is jam-packed with glitter so it is also easy to get the amount of coverage you want from it.


I love a jelly sandwich and I don't often think to do them. What are your favourite jelly sandwich combos?

Thursday, January 23, 2014

2 Year Blogiversary Mani

Hi hi!

As you know (if you saw my last post), my 2 year blogiversary has just been. I posted that day, but I hadn't had time to do anything particular on my nails at that point. I wanted to do a little 2 year anny mani for it, so that's what I am posting today. First up though, I just want to thank all you lovely people again for reading my blog, and commenting etc, and also thanks to the truly wonderful friends that I've made along the way. This blog is my little escape from studies and work and all those things and it is made just that much better by the interaction that I have with fantastic people from all over the world.


Cult Nails Fetish, a-england Encore Margot, Emily de Molly Dark Forces, stamping, studs

Cult Nails Fetish, a-england Encore Margot, Emily de Molly Dark Forces, stamping, studs
I really love how this mani came out. It is using a whole lot of products that I love which is perfect for this 2 year anny mani :) On my index and pinky fingers I used 1 coat of a-england 'Camelot' followed by 2 coats of Emily de Molly 'Dark Forces'. On my middle and ring fingers, I used 2 coats of Cult Nails 'Fetish'. My ring finger has a stud design using studs from Born Pretty Store. My middle finger is stamped with a-england 'Encore Margot' from the Ballerina collection and MoYou plate 05 from the Pro collection.

I won't get into formulas etc as most of these polishes have been reviewed previously on my blog - long story short, all of these polishes are wonderfully opaque, easy to use and they also wear remarkably well (even without top coat on 2 of my fingers).

Make sure you check out all the links to the stores of everything I used as they all make brilliant polish, plates and accessories!

Thanks again lovely readers xx

Thursday, December 5, 2013

Femme Fatale - Twilight Meteorite & Wickerman Embers

Press Sample

Hello!

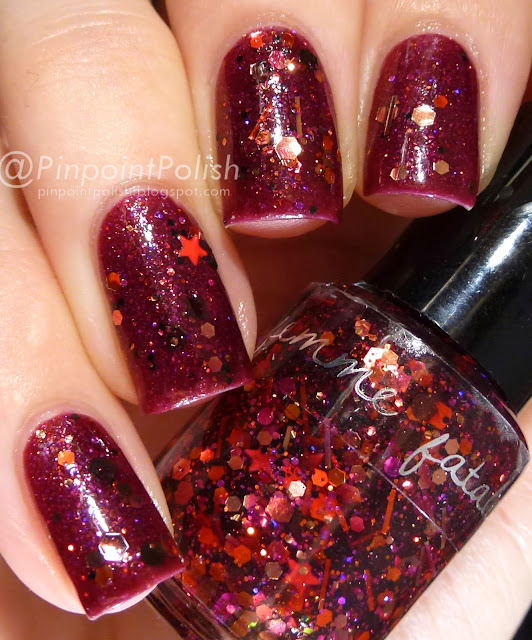
I have a couple more Femme Fatale polishes to show you on this rainy (summer?) day. This time, I have 'Twilight Meteorite' and 'Wickerman Embers'.


Twilight Meteorite, Femme Fatale, swatch

Twilight Meteorite, Femme Fatale, swatch

Twilight Meteorite, Femme Fatale, swatch
'Twilight Metrorite' is so beautiful. The base colour is a rich purpley plum colour and it is packed full of duo chrome coarse shimmer. I have shown it here on its own on my pinky and middle fingers and it is shown over a coat of black on my index and ring fingers. I like it for different reasons both ways. The black allows the duo chrome shift to become more obvious, but you lose that gorgeous base colour.


Wickerman Embers, Femme Fatale, swatch
This is a coat of 'Wickerman Embers' over a burgundy polish (the cold version of Polished by KPT 'Naughty & Nice'). This is a gorgeous glitter polish with all sorts of shimmer in there too that catches the light beautifully (also how great are those little star glitters in there?!). The base is a darkish burgundy colour, much like the colour I put it over. As was the case with Femme Fatal 'Coldwraith', this is so full of glitter that a thin coat gives amazing coverage.


Both of these were very easy to use. 'Twilight Meteorite' is slightly sheer and I am showing you 4 thin coats - as usual though, I have used more than needed as 3 coats was sufficient on my left hand. I only used 2 very thin coats over the black. 'Wickerman Embers' is so full of glitter that I only used 1 coat. The best part is that although it is very packed with glitters, I only needed one thick coat of top coat and it was reasonably smooth.


Femme Fatale polishes are available from their website (these are $10 AUD each) and they are also stockists of a whole lot of other polish brands and also makeup, so go check them out. Femme Fatale polishes are also available from some other places - be sure to check out the list of international stockists. Note - Twilight Meteorite is discontinued, so pick it up quick while it is still in stock.

You can keep up to date with Femme Fatale by following them on FacebookInstagram and Twitter.

These products were provided for review. This is my personal, unbiased opinion.
For more information, see my disclosure policy.

Wednesday, November 20, 2013

Bo Peep - Emily de Molly

Hello!

I have a little post today to show you what I am currently wearing. This is Emily de Molly 'Bo Peep'.


Bo Peep, Emily de Molly, swatch
I love this polish. It's different to anything I own. The minty green is really wearable too, it doesn't give me little pink piggy hands like some can do. 'Bo Peep' has an interesting mix of glitters in it. I love the yellow circle glitters especially.


'Bo Peep' was really easy to work with and the glitters are packed in so you get a really good amount coming onto the nail. I used 3 coats in these photos, but on my left hand 2 coats actually gave good opacity, so that's how I wore it there.


Emilly de Molly polishes are available from a number of places. I purchased mine from Femme Fatale, but check out Emily de Molly stockists here.

Sunday, October 20, 2013

The Halloween Mani that Isn't...

Hi!

I have a mani on today that was originally going to be very different and was set to be my first Halloween mani of the year. I always try what I'm going to do on my left hand first, but when I stamped over the polishes I used on my left hand it didn't show very well, so I decided to use the same colours with paler polishes... Long story short, it is no longer even remotely Halloween-ish other than the fact that the Dollish Polish glitter is part of a Halloween collection :D


So as you can see, not overly Halloween-inspeired in the end, but oh well. Once I saw how the gradient on my middle finger looked, I knew I had to use a chevron stamp inspired by my biggest nail crush of all time, Lauren of Tales About Nails!

Polishes used... The base for the glitter is Lime Crime 'Peaches <3 Cream' and the glitter is Dollish Polish 'What's This? What's This?' from last year's 'This is Halloween' collection (which has been rereleased in limited quantities this year). On my middle and index fingers is a gradient and water marble using Lime Crime 'Peaches <3 Cream', 'Pastelchio' and 'Lavendairy'. These are both stamped using Color Club 'Beyond' with Bundle Monster plates BM-408 (index) and BM-423 (middle).

As mentioned, Dolly has brought back last year's Halloween collection by popular demand. At the time of writing this post, these are still in stock, so hop over to her shop ASAP and grab them because they are awesome!!

Monday, October 14, 2013

Electric Blue - piCture pOlish (and some new Bundle Monster stampin')

Hi hi!

I have a quick post to show you today of a mani that I loved. First of all, lets look at the base I used, which is the absolutely gorgeous 'Electric Blue' by piCture pOlish.


Electric Blue, picture polish, swatch

Electric Blue, picture polish, swatch
How beautiful and glowy is 'Electric Blue'? I love navy blue polish a lot and it's polishes like this that remind me why. The base colour is really dark, but the blue shimmer shines through so amazingly.


picture polish Electric Blue, Dollish Polish Say Hello To My Kitty, Color Club Miss Bliss, Bundle Monster BM-416

picture polish Electric Blue, Dollish Polish Say Hello To My Kitty, Color Club Miss Bliss, Bundle Monster BM-416
I love how this turned out. I used the new Bundle Monster plate BM-416 with Color Club 'Miss Bliss' on the pinky and ring fingers and then I added 1.5 layers of Dollish Polish 'Say Hello To My Kitty'. I love how well the Color Club 'Halo Hues' stamp. The holo effect seems to amp up so much. The new Bundle Monster set is fantastic! So many wonderful designs. How great is it that you can get this splatter effect with out much clean-up?!

'Electric Blue' was so easy to work with. I used 3 coats for these photos, but depending on how thick your coats are, I'm sure 2 would be enough. 'Say Hello To My Kitty' needs a good tip upside down before using it, but I didn't need to fish anything out for this look. Some of the larger glitters are a little less willing to come out, but no worries for me.

piCture pOlish is available from a whole bunch of places. Make sure you check out the piCture pOlish website, you can order this polish direct from them for $10 AUD or you can have a look at their list of distributors. Dollish Polishes are available from Dolly's Big Cartel shop for $10.

Some of these products were provided for review. This is my personal, unbiased opinion.
For more information, see my disclosure policy.

Friday, September 20, 2013

The Pit of Despair - Dollish Polish

Hi!

So I'm carrying on with showing you the Dollish Polish 'The Princess Bride' collection polishes that I managed to snag when Dolly first released them. I've loved them all so far (see the previous posts here, here and here) and I seem to have done a mini art-y feature nail with each polish so I figured I may as well carry that on. Tonight is 'The Pit of Despair'...


The Pit of Despair, The princess bride, dollish polish, swatch

The Pit of Despair, The princess bride, dollish polish, swatch
I love how this turned out actually. First of all, I like 'The Pit Of Despair', it has a nice mix of glitter. Mainly the glitter is purple, blue and black, but there is also some flakes in there, little holo glitters and even some shimmer too. 'The Pit Of Despair' is pictured over Lime Crime 'Milky Ways'. I love the way the feature nail fits with this mani. For the gradient I used Essie 'Butler Please', Lime Crime 'Once In A Blue Mousse' and 'Milky Ways', then I stamped with Color Club 'Beyond' with Bundle Monster plate BM-201.


'The Pit Of Despair' was ok formula-wise. There was pretty decent coverage. I used 1 and a half coats. I did have to go on a little fishing expedition for the large hex and a square, but I did get squares on other fingers so they do come out, just not on my swatching hand of course!


At the time of writing this, 'The Pit of Despair' is in stock on Dolly's Big Cartel shop, so hop over there and grab it for $10.

Wednesday, August 21, 2013

Anybody Want A Peanut - Dollish Polish

Hey hey!

Quick post today to show you a mani I wore for a freakishly long time last week. I actually wore it twice in a row because I didn't take photos the first time round, but I liked it so much I redid it (though ever so slightly different) and wore it over again. This is another polish from the reasonably recent 'The Princess Bride' collection from Dollish Polish. Every one of the polishes I bought from that collection has been brilliant by the way (see here and here)!


Anybody Want A Peanut, The Princess Bride, Dollish Polish, swatch, LeaLaC XL-B
'Anybody Want A Peanut' has a really pretty nude crelly (crème/jelly) base with brown, copper and gold glitters through it. I love the mix of glitters in this. It's such a nice subtle glitter. It looks yummy and always makes me hungry when I look at it! Does that make sense to anyone else? No? Moving on then...
For the accent finger I did a gradient using OPI 'Tickle My France-y' and 'You Don't Know Jacques' and then stamped over it using Barry M 'Gold Foil' and LeaLaC XL-B stamping plate.


'Anybody Want A Peanut' was easy to work with, though naturally it was a little sheer (expected from a crelly base). In saying that, I only used 3 (thick-ish) coats for full opacity, which is very reasonable in my opinion. Overall this is another big win from Dolly for me.

At the time of writing this, 'Anybody Want A Peanut' is still in stock on Dolly's Big Cartel shop, so hop over there and grab it for $10.

Sunday, August 4, 2013

Have Fun Storming The Castle - Dollish Polish (+ a Gradient)

Hi folks!

I have a little post for you today featuring another of the Dollish Polish Princess Bride polishes. Today, I have 'Have Fun Storming The Castle' to show you...


Have Fun Storming The Castle, Princess Bride, Dollish Polish, swatch, Gradient nails
I love 'Have Fun Storming The Castle', it's quite unique in my fairly extensive indie collection. I like the grey/beige milky base. Can you believe that this is my first polish with large circles in though? I decided to pair this polish with a bit of a gradient to go with the burgundy hexes that are in it. For the gradient I used OPI 'Manicurist of Seville' and 'My Boyfriend Scales Walls' with Lime Crime 'Lavendairy'.


The formula of 'Have Fun Storming The Castle' was easy to work with and this is showing 3 coats over a white base. I don't think you need a base because it actually builds up quite easily. The only issue is that the larger glitter pieces didn't come out too readily. I did have to fish for my one large circle on my index finger. This doesn't bother me, but I know it might bother some people. Overall I love the mix of colours and shapes of glitter.


At the time of writing this, 'Have Fun Storming The Castle' is still in stock on Dolly's Big Cartel shop, so hop over there and grab it for $10.

Friday, July 5, 2013

As You Wish - Dollish Polish & a Bit of a Skittlette

Hey hey,

How are you all? Yesterday I received the polishes I ordered from the new Dollish Polish collection based on The Princess Bride. I had to get some of them because of the inspiration alone. What a classic movie. In fact, I watched it again last night. Naturally, the first polish I had to try was 'As You Wish', but as soon as I saw them, I knew that it would need to be paired up with 'Hello, My Name Is Inigo Montoya' (does everyone else say the end of that quote every time they see the name of that polish?). I did a bit of a skittlette with 'As You Wish'. If you don't know what a skittlette mani is, make sure you hop over to ChitChatNails. The wonderful Marta, one of my favourite bloggers, coined the term and her skittlettes are always so beautiful.


Skittlette, As You Wish, Hello my name is inigo montoya, Dollish Polish, LeaLaC XL-b
This is my first skittlette attempt and I'm digging how it turned out, albeit slightly Australian feeling. I love, love, love the look of 'Hello My Name Is Inigo Montoya' over top of 'As You Wish'. It's just one coat and it gives such a beautiful olive colour. For the stamp, I used a-england 'Saint George' and the LeaLaC XL-B plate. On my index and pinky fingers I have a couple of glequins from Born Pretty Store.


As You Wish, Dollish Polish, The Princess Bride, swatch


As You Wish, Dollish Polish, The Princess Bride, swatch
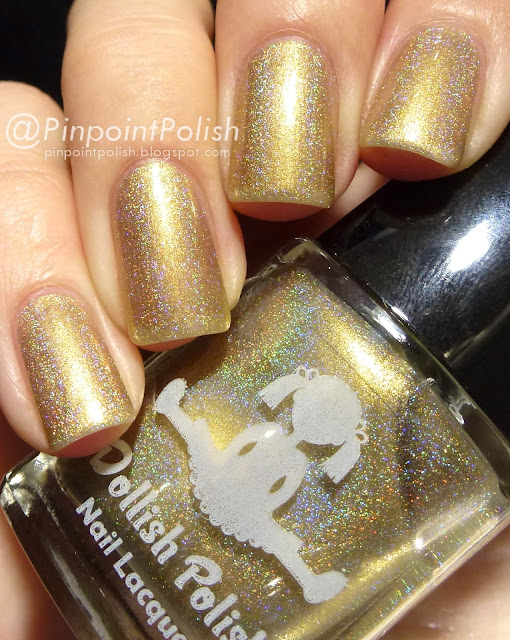
I love 'As You Wish'. Surprised? Nope, not a bit. It's a gorgeous olive leaning gold holo. I find it difficult to wear gold often, but 'As You Wish' is a really soft gold and very wearable. The olive undertones also help with the wearability in my opinion.


'As You Wish' is a little bit sheer, but over all really easy to work with. Shown is 3 coats and in the photos you can see a wee bit of VNL, but it's perfectly fine in real life for me. I didn't use any special base coat for this polish either, just my usual Duri 'Rejuvacote' and Cult Nails 'Get It On' combination (these are my absolute holy grail strengthener and base coat by the way). The photos of 'As You Wish' alone are without top coat.


'As You Wish' and 'Hello, My Name Is Inigo Montoya' are available from Dollish Polish (at least they are available at this very moment). The LeaLaC XL-B plate is available from Llarowe and 'Saint George' is available from a bunch of places (check out the 'Where To Buy' tab on the a-england website).

Wednesday, June 19, 2013

G'day Matte - piCture pOlish

Hi guys!

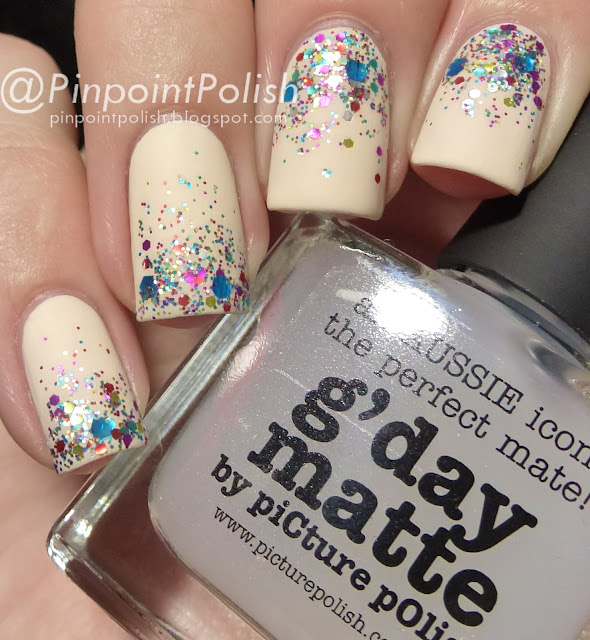
I am sad to say that my piCture pOlish review series is coming to a close today! I've really loved all of the polishes that I got to show you. I have a pretty awesome polish to finish on. This is their fairly new matte top coat, 'G'day Matte'. I absolutely love me some matte nails, but I haven't posted many on here because I have trouble making them look good. I have always used Essie 'Matte About You' and have always had a bit of trouble with it, but 'G'day Matte' is a whole different story. I love it.

One more thing, if you follow me on Instagram, you may have seen that I did a spot of hand modelling on the weekend for the awesome kiwi designer, Saben. We got our nails done by the lovely Leah Light and her team. It was heaps of fun, but they needed us all to have almond shaped nails. As you know, I keep my nails very square usually. I have started to head back that way, but they are very short (especially at the sides) so bear with me while I grow them back to my usual square shape :)

Anyway onto 'G'day Matte'...


Picture Polish G'day Matte, Cosmos, a-england Lancelot

Picture Polish G'day Matte, Cosmos, a-england Lancelot
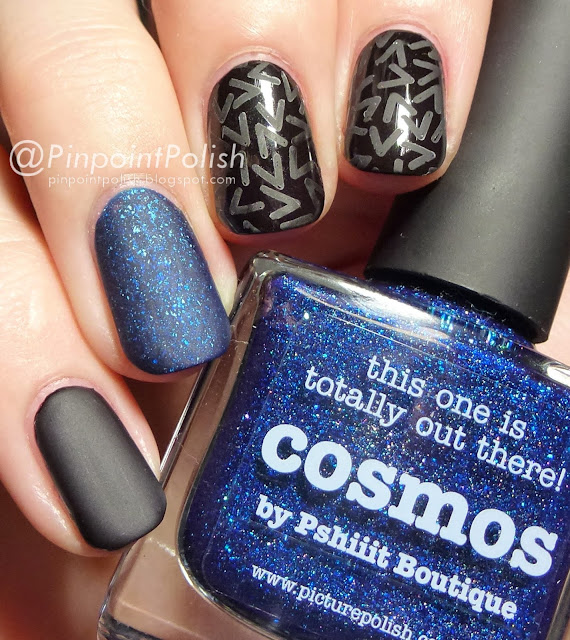
So here's the bottom line. 'G'day Matte' is amazing! It is so incredibly forgiving and is so so so easy to use. I don't care how who you are, you will be able to rock this baby! Look how pretty it is over 'Cosmos'. Love it - I don't know what else to say. I used 'LeaLaC XL - B' stamping plate and I used a-england 'Lancelot' and, of course, piCture pOlish 'Cosmos' as the bases.


Picture Polish G'day Matte, Cosmos, a-england Lancelot
Déjà vu anybody? When I did my mani with piCture pOlish 'Blogger', I mattified it and, holy moly, it looked cool. I've never ventured into the land of matting glitter before, but I'm thinking this won't be the last time.


So I already said that the formula is amazing. As I said, it is incredibly forgiving. Absolutely zero trouble at al. It levelled out perfectly and as usual with a matte top coat, dried really fast. Speaking of drying really fast, the stamping worked perfectly using 'G'day Matte', but i did work really quickly so it would transfer before drying.


piCture pOlish is available from a whole bunch of places. Make sure you check out the piCture pOlish website, you can order this polish direct from them for $10 AUD or you can have a look at their list of distributors.


This product was provided for review. This is my personal, unbiased opinion.
For more information, see my disclosure policy.