Wednesday, August 29, 2012

It's A Me, Mario & Go Luigi! - Dollish Polish + Neon Gradient

It's definitely becoming more spring like here in Auckland and with the sun, comes a will to wear bright colours (actually who am I kidding, I never follow seasons). Anyway that sound like a good excuse to try something more with the China Glaze Summer Neons.


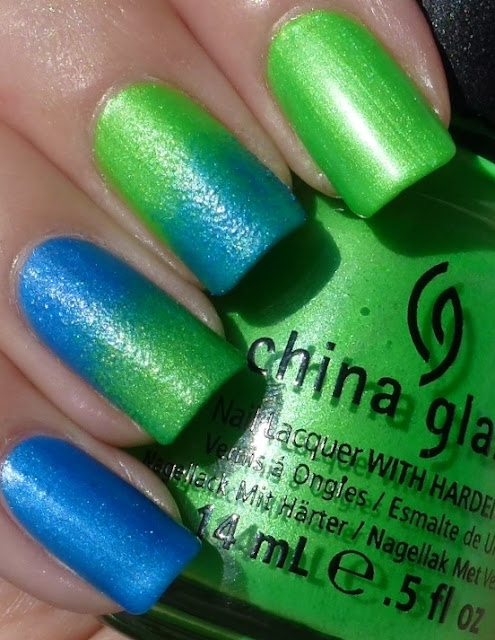
It's A Me, Mario! Go Luigi! - Dollish Polish, I'm With The Lifeguard, Splish Splash - China Glaze, Gradient Nails
I started with a bit of a gradient with 'I'm With The Lifeguard' (green) and 'Splish Splash' (blue). 'Splish Splash' isn't quite as opaque, so you can see the the green is showing through quite a bit under it on my middle finger. That's ok though, you'll see why in a moment. This is without any top coat, hence the funny texture from the sponge. As usual, I followed Sammy's gradient technique.


It's A Me, Mario! Go Luigi! - Dollish Polish, I'm With The Lifeguard, Splish Splash - China Glaze, Gradient Nails
Seeing as it appears no manicure is complete, these days, without a lick of glitter, I dipped into my vastly expanding collection of wonderful creations by Dolly and had to get out 'It's A Me, Mario!' with an accent of 'Go Luigi!' on my middle finger.


It's A Me, Mario! Go Luigi! - Dollish Polish, I'm With The Lifeguard, Splish Splash - China Glaze, Gradient Nails
I loved wearing this so much! So bright, fun and slightly obnoxious, just the way I like it. I couldn't decide originally what I wanted to wear 'It's A Me, Mario!' over, so I think it's good that I got to see it over both green and blue here. I also like the way that it's not immediately obvious that there's anything different about any of the nails, then you realise that one of them has green instead of red glitter. 'It's A Me, Mario!' and 'Go Luigi!' work so perfectly together.


The China Glaze neons, 'I'm With The Lifeguard' and 'Splish Splash', both are pretty effortless to apply. They are ever so slightly sheer and so I had to apply 3 thin coats, but it's worth it. Both glitters could have done with a little more shaking, but I was a bit too excited and so application wasn't quite as easy as it could have been. At the end of the day, just regular glitter application really though. I fished for one of the stars and got slightly over-zealous sticking it down - with the skewer that I used to mix the colours for the gradient! So the star on my middle finger is covered in green, but I promise you this is entirely my own fault and there is no bleeding of colour, or anything like that, with the polish.

China Glaze polishes can be purchased from Candy Girl (for the Kiwi's out there) and the Dollish Polish Mario collection can be purchased from the usual places - Dolly's Big Cartel Shop as well as Llarowe (and I've just now checked and they're in stock, so go quick!!).
Saturday, August 25, 2012

Expecto Patronum - Dollish Polish

I am officially at the beginning of a two week study break :) I'll be going home to Wellington in the second week, which will be nice, and hopefully I'll have a go at a few more nail techniques (might have another go at water marbling). Anyway, I've got a polish to show you today that I love, but I'm going to be honest, considering that it is inspired by Harry Potter... I was bound to like it. This is Dollish Polish 'Expecto Patronum'.


Expecto Patronum, Dollish Polish, swatch
'Expecto Patronum' has a white, jelly base with three different sizes of teal glitter. There is also some iridescent flakie bits in there too. You can't really see them in any of my photos but they appear sort of red in real life and they catch the light.


Expecto Patronum, Dollish Polish, swatch
I love polishes that basically give you an instant jelly sandwich. The base is just sheer enough to be able to see the glitter in the underneath layers.


Expecto Patronum, Dollish Polish, swatch
You can see the jelly sandwich look in the macro, where some glitters are more prominent, at the surface, and some are slightly more hidden.


I used four coats of 'Expecto Patronum' for these photos. I actually left my left hand at three coats and that was enough for regular wear. The polish was a bit too thick and that gave me pretty thick nails. I will definitely thin it out a little bit next time I wear it, not a big issue though. One thing I loved was the clean look of the white polish without the white-out look. The teal glitter gives 'Expecto Patronum' a really ethereal look, perfectly fitting for this magic inspired polish.

Dollish Polish is available from Llarowe and of course Dolly's Big Cartel shop, as well as a couple of other e-tailers.

Wednesday, August 22, 2012

Agro - China Glaze & Secret Sauce - Enchanted Polish

Hi folks!

I've got a little something to show you today that has been around for a little while now. This is 'Agro' from China Glaze's Hunger Games Collection. I absolutely love the look of a lot of the polishes from this collection and this one isn't an exception. I love olive coloured polish, so naturally this polish had to be bought...


Agro, China Glaze, Hunger Games Collection, Secret Sauce, Enchanted Polish
'Agro' is packed with shimmer and this is showing it with no topcoat. You can see some little brushstrokes but they're not bad and with top coat, they're not really noticeable in real life. I love the earthy look the gold shimmer gives it. Reminds me of all the pine forests we drive through in the central North Island, when we drive home to Wellington (which reminds me that I can't wait to go home in a week and a half!!). Also how when the shimmer catches the light, is accentuates the slightly blackened edges.


Agro, China Glaze, Hunger Games Collection, Secret Sauce, Enchanted Polish
I decided I wanted to add something to 'Agro' and I thought I'd give Enchanted Polish 'Secret Sauce' a go. Turns out it was not really very obvious over 'Agro'. That's ok though.
There's one coat of 'Secret Sauce' on top of my pinky and middle fingers.


Agro, China Glaze, Hunger Games Collection, Secret Sauce, Enchanted Polish
'Secret Sauce' gives 'Agro' a more golden tone. You can notice a bit of the red sheen that I love about 'Secret Sauce', but I was really hoping that it would be more obvious.


Overall I liked these polishes together, but I was left hoping for something a little more. 'Agro' was really easy to apply. Two coats gave more than perfect coverage and that meant that you could use the second coat to make it nice and even and take care of your brush strokes.

Kiwi's you can get 'Agro' from Candy Girl and 'Secret Sauce' can be purchased from Llarowe.

Saturday, August 18, 2012

Lapis Amethyst - Sally Hansen

Earlier in the week when I was wearing 'Unfor-Greta-bly Blue', I had to go to work and I didn't really have time to take that off, so I had to quickly put something on it to tone it all down. I do this quite often, but this time I had to show you guys because it actually looked really pretty. I used Sally Hansen's Nail Prisms 'Lapis Amethyst'.


Lapis Amethyst, Sally Hansen, Nail Prisms, swatch
I know it looks kind of frosty here and believe me, I run from frosty polish as much as the next guy, but I actually really liked this. It is just such a gorgeous duochrome, shimmer top coat that goes from a bright aqua blue through purple to pink. I couldn't seem to capture the bright aqua colour but this is showing the more blue side of it (plus look at those bright purple sides of my nails).


Lapis Amethyst, Sally Hansen, Nail Prisms, swatch
This is the more pinky purple side of 'Lapis Amethyst'. It's really glowy and looked really gorgeous in the sun (these photos are taken in late afternoon sun).


I really liked how the stamped lightning bolts just peeked through from underneath this polish. This is just one quick coat of 'Lapis Amethyst' and I think it was just the right coverage in order to still see the manicure underneath.


And now for something a bit different, when we were on our way home from work last night, a little electrical storm started. I love storms and I especially love going to sleep when it's raining, I find it so calming. We took some videos just on an iphone and then screen captured some of the frames (so please excuse the quality). The pictures that we got actually quite remind me of this mani so I figured I may as well show you them too. If you follow me on Twitter or Instagram (@PinpointPolish), you may have already seen them :)


Tuesday, August 14, 2012

Unfor-Greta-bly Blue - OPI & BM-305

Today I would like to show you the second polish that I got from the OPI Germany collection that has just been released. I am a sucker for blue polish, so naturally, I had to get this polish. This is 'Unfor-Greta-bly Blue'...


Unfor-Greta-bly Blue, OPI Germany collection, swatch, Bundle Monster BM305
This is a super dooper glowing blue with a super dooper amount of ultra-fine teal shimmer! Love, love, love! This is without top coat.


Unfor-Greta-bly Blue, OPI Germany collection, swatch, Bundle Monster BM305
I decided to add a bit of stamping and I somehow ended up with a mani that makes me think of super heroes. I'm so happy with this polish and this stamp! I used Bundle Monster plate BM-305.


Unfor-Greta-bly Blue, OPI Germany collection, swatch, Bundle Monster BM305
'Unfor-Greta-bly Blue' has so many facets. It can look really bright teal blue...


Unfor-Greta-bly Blue, OPI Germany collection, swatch, Bundle Monster BM305
But it can also become sort of blackened around the edges. Ahhh so deliciously pretty.


'Unfor-Greta-bly Blue' was really easy to apply. Like 'Every Month Is Oktoberfest', the first coat gives decent coverage and the second coat just makes everything come together and gives that gorgeous glow. I was worried that it was going to be really brush-strokey, but once it dried, most of that disappeared. You actually can't really see any brush-strokes in real life. BM-305 was also really fantastic. I had absolutely no problem with this at all. I used China Glaze 'Sci-Fi' as my stamping polish.

Saturday, August 11, 2012

Every Month Is Oktoberfest - OPI

I managed to get my hands on two amazing polishes from OPI's Germany collection that has just been released, so today I'll be showing you the first of them. 'Every Month Is Oktoberfest' is one that I knew I had to have the minute I saw it popping up on all my favourite blogs. Turns out it is even more beautiful than I could have imagined in real life.


Every Month Is Oktoberfest, Germany Collection, OPI, swatch, Bundle Moster Plate BM-313
This is just such a delicious vampy shade. MMMMMMMM I love it! It is infact an indigo, purpley blue base with a ridiculous (ridiculously good) amount of shimmer. I think it's all red shimmer, but it seems to shift a little bit to gold in certain lighting. The blue of the base is really obvious on the first coat, but disappears quite a lot on the second coat. Even though it's less obvious, it still gives this polish a perfect little something extra in my opinion, that hint of underlying indigo is what makes this polish jump to the top of my favourite vampy polish list.


Every Month Is Oktoberfest, Germany Collection, OPI, swatch, Bundle Moster Plate BM-313


Every Month Is Oktoberfest, Germany Collection, OPI, swatch, Bundle Moster Plate BM-313
This shimmer was so hard to capture in all its glory. These photos show a little taste of the bright red glow that this beauty has. I decided to add a little stamping and so I tried a couple more designs from my new Bundle Monster plates. Both these designs are from plate BM-313. I used Barry M 'Gold Foil' to stamp and I think the gold played well with 'Every Month Is Oktoberfest'.


Every Month Is Oktoberfest, Germany Collection, OPI, swatch, Bundle Moster Plate BM-313
You can see here that slightly gold shift. The corners of my top two fingers are showing the base colour. I'm not quite sure why this is so obvious here. It must be a slightly thinner bit of application, but I looked and looked and could not see this blue in real life! Strange.


The formula on this was also lovely. One coat gives really good coverage and the second coat just deepens everything and gives the polish that beautiful glow. 'Every Month Is Oktoberfest' is not too thick or thin and has a perfect self-levelling formula, applying like butter. I can't say enough how much I love this polish and it really has to be seen in real life to fully appreciate it. As for the plate, BM-313, no problem at all! Both images picked up and transferred really easily. I am still a bit of a newbie when it comes to stamping, but I figure practice makes perfect and maybe one day I can learn to not panic every time I attempt it - you should see me, as soon as I've picked up the image, my heart starts beating FAST and it's panic station. I have to admit I tried to do my pinky finger one and missed literally 2/3 of my nail with the first stamp!

For the Kiwi's, I got this at Life Pharmacy and there is a buy two, get one free deal at the moment. I think OPI's cost around $25 at pharmacies so they're a bit cheaper than Farmers and made even better by the special deal :)


I also want to say that I have been nominated by two lovely ladies for a Liebster Award. I received one from Nicola from Always Trust The Gene Genie and the second nomination was from GelaNails. They both do some gorgeous nail art! I am absolutely swamped at uni at the moment but I have a mid-semester break in a couple of weeks so I will try and answer the questions etc then :) Thanks again ladies!

Tuesday, August 7, 2012

Jelly Sandwich Take Two - Spank You Very Much - Dollish Polish & Care To Danse? - OPI

I did me just a little shopping over the weekend and I managed to pick up a couple of the polishes from OPI's just-released Germany collection (they are AMAZING!). I've never known NZ to get a collection so fast! I hope this is how it will always be in the future. For any Kiwi's, lots of pharmacies have a buy two, get one free deal going on at the moment. I also finally got a polish from the New York City Ballet Collection by OPI, so logically I had to do a jelly sanger ASAP right?! So here we go with my second ever jelly sandwich (how have I not done more of these mani's?)...


Spank You Very Much - Dollish Polish, Care To Danse? - OPI, Jelly Sandwich
I used a coat of OPI 'Steady As She Rose' to give a bit of colour under the jelly so I didn't need a billion coats (it is almost exactly the same colour). On top of that, I put one coat of OPI's 'Care To Danse?' followed by one coat of Dollish Polish 'Spank You Very Much' and finally two more coats of 'Care To Danse?' (I know, that's a lot of layers of polish).


Spank You Very Much - Dollish Polish, Care To Danse? - OPI, Jelly Sandwich
I love how this has a really soft, milky look. And I think 'Spank You Very Much' is the perfect glitter for this. This polish is so densely packed with glitter that you can have good coverage with one quick swipe. 'Care To Danse?' has a really pretty subtle pinky purple hue to it.


Spank You Very Much - Dollish Polish, Care To Danse? - OPI, Jelly Sandwich
This photo is taken under artificial, white light and the polish leans slightly more peachy pink on me. I think this is just because I am SO pasty! I love how pretty and feminine this mani is.


Spank You Very Much - Dollish Polish, Care To Danse? - OPI, Jelly Sandwich
Here's the macro so you can see just how amazing 'Spank You Very Much' is. I will have to definitely show you this one on its own at some point.


'Care To Danse?' really is very sheer, though nice and easy to work with.The thin coat of 'Steady As She Rose' just really helped to give it that little boost of colour and saved on several coats. 'Spank You Very Much' has a great formula for a glitter. As I said earlier, it is so dense so it's really easy to get plenty of glitter on your nail without having to use a really thick (or multiple) coats. I used fairly thin coats of 'Spank You Very Much' and I really like the coverage that gave.
I loved wearing this girly mani and I can't wait to try some other jelly sammies!